JQuery pour masquer ou afficher des champs de formulaires

JQueryJQuery est un framework Javascript qui a révolutionné la manière dont ont peut générer des événements côté client. L’interaction entre Javascript et HTML est devenue beaucoup plus aisée et standardisée grâce à JQuery.

Dans cet article, je montre comment gérer l’affichage de champs de formulaire grâce à JQuery.

La clef de JQuery réside dans la balise <head> de votre document. JQuery.js est un fichier javascript qui contient les fonctions principales. J’en ai téléchargé la version allégée (72 Ko) à partir de JQuery.com

<script type=”text/javascript” src=”./js/jquery-1.4.2.min.js”></script>

La liste déroulante (select) fait afficher des champs de formulaire

Mon premier exercice est de laisser JQuery afficher des champs de formulaire si une valeur particulière d’un champ liste déroulante est sélectionnée.

Voici mon formulaire HTML avec 3 éléments : 2 listes déroulantes (id = type et id = choix) et un textarea (id = text) :

<form>
<select id=”type”><option>choix de type</option><option value=”1″>type 1</option><option value=”2″>type 2</option><option value=”3″>type 3</option></select><br />
<select id=”choix”><option>choix</option><option value=”1″>choix 1</option><option value=”2″>choix 2</option><option value=”3″>choix 3</option></select><br />
<textarea id=”text”></textarea>
</form>

L’affichage de cette page dans un navigateur affichera les 3 éléments (2 listes déroulantes et le champs textarea).

Mon objectif est d’afficher seulement la première liste déroulante (id = type) et de seulement afficher la seconde liste déroulante et le textarea si la troisième entrée de la première liste déroulante est sélectionnée.

Dans la <head> de mon document, j’ajoute un script qui commence avec la fonction $(document).ready(). Ceci vous permet de charger autant de fonctions que nécessaire dès que le DOM est chargé et avant que le contenu de votre page ait été chargé. Vous pourriez- enregistrer cette fonction à l’intérieur d’un fichier .js séparé et le pouvoir de JQuery est que vous n’aurez rien d’autre à ajouter au contenu HTML de votre document :

<script language=”javascript”>//<![CDATA[

$(document).ready(function() {

$("#choix").hide();

$("#text").hide();

$("#type").change(function() {

if ( $("#type").val() == "3"){

$("#choix").show();

$("#text").show();

}

else{

$("#choix").hide();

$("#text").hide();

}

});

if ( $("#type").val() == "3"){

$("#choix").show();

$("#text").show();

}

$("#choix").change(function() {

var val = $("#choix").val();

$("#text").append(val + "\n");

});

});

//]]></script>

Vous devriez aisément compendre ce que ce script fait : la liste déroulante “choix” et le champ textarea sont masqués par défaut. JQuery a accès aux éléments de formulaire grâce à leur id (#choix, par exemple). Si la valeur de la liste déroulante “type” est 3, les autres éléments du formulaire seront affichés, sinon, ils seront masqués. Puis si lma valeur de la liste déroulante “choix” change, sa valeur sera ajoutée au contenu du champ textarea.

La case à cocher (checkbox) fait afficher des champs de formulaire


Mon second exercice est de laisser JQuery identifier si une case à cocher (checkbox) est cochée pour faire afficher ou masquer des champs de formulaire.

J’ajoute un champ checkbox à mon formulaire HTML :


<form>
<input type=”checkbox” id=”check” />
<select id=”type”><option>choose a type</option><option value=”1″>type 1</option><option value=”2″>type 2</option><option value=”3″>type 3</option></select><br />
<select id=”choice”><option>choice</option><option value=”1″>choice 1</option><option value=”2″>choice 2</option><option value=”3″>choice 3</option></select><br />
<textarea id=”text”></textarea>
</form>

Puis je modifie le script de ma balise <head> pour identifier si la case a été cochée ou non :

<script language=”javascript”>//<![CDATA[

$(document).ready(function() {

$("#choix").hide();

$("#text").hide();

$("#type").change(function() {

if ( $("#type").val() == "3"){

$("#choix").show();

$("#text").show();

}

else{

$("#choix").hide();

$("#text").hide();

}

});

if ( $("#type").val() == "3"){

$("#choix").show();

$("#text").show();

}

$("#check").change(function() {

if($("#check").attr("checked")) {

$("#choix").show();

$("#text").show();

}

else{

$("#choix").hide();

$("#text").hide();

}

});

$("#choix").change(function() {

var val = $("#choix").val();

$("#text").append(val + "\n");

});

});

//]]></script>

Avec JQuery, vous pourrez aussi ajouter quelques effets à la “scriptaculous” avec ces actions show et hide :

$(“#choix”).show(“slow”);

affichera l’élément de formulaire lentement.

Vous pourriez aussi utiliser une valeur numérique :

$(“#choix”).hide(200);

Webliography :
JQuery.com

JQuery to show or hide form fields

JQueryJQuery is a javascript library that has revolutionized the way we can trigger client-side events. Having Javascript interact with HTML has become much easier and also more standard thanks to that framework.

In this post, I’ll tackle displaying form elements thanks to JQuery.

The key to JQuery lies in the <head> of your document. JQuery.js is a javascript file that contains the main functions. I’ve downloaded the minified version (72 Ko) from JQuery.com

<script type=”text/javascript” src=”./js/jquery-1.4.2.min.js”></script>

Display form fields on change select box value :

My first exercise is to let JQuery identify the select box value which is selected to display or hide extra form fields.

So, here’s my HTML form with 3 elements : 2 select boxes (id = type and id = choice) and a textarea (id = text) :

<form>
<select id=”type”><option>choose a type</option><option value=”1″>type 1</option><option value=”2″>type 2</option><option value=”3″>type 3</option></select><br />
<select id=”choice”><option>choice</option><option value=”1″>choice 1</option><option value=”2″>choice 2</option><option value=”3″>choice 3</option></select><br />
<textarea id=”text”></textarea>
</form>

Displaying such a form in a browser will display the 3 elements (2 select boxes and the textarea).

My objective is to show the first select box only (id = type) and to only display the second select box and the textarea if the third item of the first select box is selected.

So, in the <head> of my document, I’ll add a script that starts with the $(document).ready() function. This allows you to load as many functions as necessary as soon as the DOM is loaded and before the loading of the contents of your page. You could store this function inside a separate .js file and the power of JQuery is you won’t have to add anything to your HTML content :

<script language=”javascript”>//<![CDATA[

$(document).ready(function() {

$("#choice").hide();

$("#text").hide();

$("#type").change(function() {

if ( $("#type").val() == "3"){

$("#choice").show();

$("#text").show();

}

else{

$("#choice").hide();

$("#text").hide();

}

});

if ( $("#type").val() == "3"){

$("#choice").show();

$("#text").show();

}

$("#choice").change(function() {

var val = $("#choice").val();

$("#text").append(val + "\n");

});

});

//]]></script>

So you’ll easily guess what that script does : the “choice” select box and the textarea are set to hidden by default. JQuery here accesses the form element thanks to their id (#choice, for example). If the value of the “type” select box is set to 3, the other form elements are shown, if not, they’re hidden. Then if the value of the “choice” select box is changed, its value will be added to the textarea content.


Display form fields on change checkbox :

My second exercise is to let JQuery identify if a checkbox is ticked to display or hide form fields.

I’ll add a checkbox to my HTML form :


<form>
<input type=”checkbox” id=”check” />
<select id=”type”><option>choose a type</option><option value=”1″>type 1</option><option value=”2″>type 2</option><option value=”3″>type 3</option></select><br />
<select id=”choice”><option>choice</option><option value=”1″>choice 1</option><option value=”2″>choice 2</option><option value=”3″>choice 3</option></select><br />
<textarea id=”text”></textarea>
</form>

Next I’ll modify the script in my <head> tag to handle checkbox ticking (or not) :

<script language=”javascript”>//<![CDATA[

$(document).ready(function() {

$("#choice").hide();

$("#text").hide();

$("#type").change(function() {

if ( $("#type").val() == "3"){

$("#choice").show();

$("#text").show();

}

else{

$("#choice").hide();

$("#text").hide();

}

});

if ( $("#type").val() == "3"){

$("#choice").show();

$("#text").show();

}

$("#check").change(function() {

if($("#check").attr("checked")) {

$("#choice").show();

$("#text").show();

}

else{

$("#choice").hide();

$("#text").hide();

}

});

$("#choice").change(function() {

var val = $("#choice").val();

$("#text").append(val + "\n");

});

});

//]]></script>

With JQuery, you’ll also have some “scriptaculous” effects with show and hide actions :

$(“#choice”).show(“slow”);

will slowly display your form element.

You could also use a numeric value :

$(“#choice”).hide(200);

Webliography :

JQuery.com

JQuery event tracker pour Google Analytics

Google Analytics est l’outil statistique par excellence pour comptabiliser les hits sur votre site. Il vous donne des statistiques à propos de vos visiteurs, à propos des sources de trafic vers votre site et à propos des pages vues.

Ces outils sont assez utiles si vous désirez des informations sur qui vient visiter votre site et quelles pages sont les plus visitées.

Un autre outil est le suivi des événements (event tracker) qui est accessible par le menu Contenu / Suivi des événements.

Code de suivi asynchrone

Pour finaliser votre compte Google Analytics, vous devez copier-coller un bout de code de suivi donné par GA (à coller juste avant la balise </body> de vos pages).

Google Analytics suggère que vous ne copiez pas ce code de suivi à placer à la fin de vos pages, mais de le remplacer par un code de suivi asynchrone à coller dans la <head> de votre document :

<script type=”text/javascript”>
var _gaq = _gaq || [];
_gaq.push(['_setAccount', 'UA-XXXXX-X']);
_gaq.push(['_trackPageview']);
(function() {
var ga = document.createElement(‘script’); ga.type = ‘text/javascript’; ga.async = true;
ga.src = (‘https:’ == document.location.protocol ? ‘https://ssl’ : ‘http://www’) + ‘.google-analytics.com/ga.js’;
var s = document.getElementsByTagName(‘script’)[0]; s.parentNode.insertBefore(ga, s);
})();
</script>

Il vous faudra bien entendu remplacer le account ID (UA-XXXXX-X) par le vôtre.

Ce bout de code fonctionnera aussi bien que l’ancien code de suivi et n’attendra pas que la fin de la page soit chargée pour s’exécuter puisqu’il se trouve dans la <head> de votre document.

Pour suivre les événements sur votre page, disons des clics sur des liens, j’ai ajouté une fonction à ce script :


<script type=”text/javascript”>
var _gaq = _gaq || [];
_gaq.push(['_setAccount', 'UA-XXXXX-X']);
_gaq.push(['_trackPageview']);
(function() {
var ga = document.createElement(‘script’); ga.type = ‘text/javascript’; ga.async = true;
ga.src = (‘https:’ == document.location.protocol ? ‘https://ssl’ : ‘http://www’) + ‘.google-analytics.com/ga.js’;
var s = document.getElementsByTagName(‘script’)[0]; s.parentNode.insertBefore(ga, s);
})();


function trackClick(text,link,title) {
_gaq.push(['_trackEvent',text,link,title]);
};
</script>

Cette fonction trackClick enverra des informations à l’outil de suivi des événements de Google Analytics. Les attributs passés à cette fontion sont :

  • une categorie : le texte du lien
  • une action : l’adresse du lien
  • un libellé : l’attribut titre du lien

Donc, si ma page contient un lien comme celui-ci :

<a href=”./produits.php” title=”Choisissez un de nos produits”>Nos produits</a>

le script enverra les informations suivantes à GA si le lien est cliqué :

  • une categorie : Nos produits
  • une action : ./produits.php
  • un libellé : Choisissez un de nos produits

Pour que ces données soient envoyées à GA, j’utiliserai JQuery. Donc je devrai tout d’abord télécharger jquery.js, l’uploader sur mon serveur Web et ajouter la ligne suivante à la <head> de mon document :

<script type=”text/javascript” src=”jquery.js”></script>

Puis j’ajouterai un autre script qui lancera ma fonction trackClick quand un lien est cliqué :
<script type=”text/javascript”>
$(document).ready(function(){
$(‘a’).click(function(){
var eventCategory = $(this).attr(‘title’);
var trackURL = $(this).attr(‘href’);
var text = $(this).text();
trackClick(text,trackURL,eventCategory);
});
});
</script>

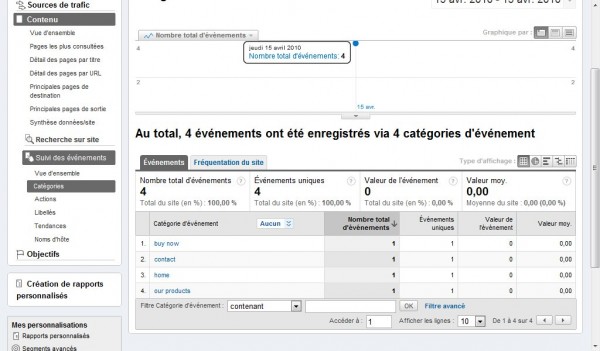
Vous devrez attendre un moment avant que Google Analytics n’affiche des événements, mais une fois fait, vous pourriez voir les résultats suivants :

Event tracking Google Analytics

Vous pouvez parcourir vos données par catégorie, par action et par libellé.

Webliography

Google’s Event Tracking Guide

Asynchronous Tracking

JQuery event tracker for Google Analytics

Google Analytics is the ultimate tool if you want to get some trustworthy statistics about the hits on your website. It will easily give you statistics about your visitors, about the sources of traffic to your site and about pageviews.

This is fairly useful if you want general information about who comes to your site and what pages are viewed most.

Another useful tool is the event tracker which is accessible under Menu Content / Event Tracker.

Asynchronous Tracking

In order to finalize your Google Analytics Account, you need to copy-paste Google tracking code snippet to the bottom of your pages (just before the </body> tag).

Google Analytics suggests you erase that code at the end of your page and replace it by an asynchronous tracking code to be pasted in the <head> of your document :

<script type=”text/javascript”>
var _gaq = _gaq || [];
_gaq.push(['_setAccount', 'UA-XXXXX-X']);
_gaq.push(['_trackPageview']);
(function() {
var ga = document.createElement(‘script’); ga.type = ‘text/javascript’; ga.async = true;
ga.src = (‘https:’ == document.location.protocol ? ‘https://ssl’ : ‘http://www’) + ‘.google-analytics.com/ga.js’;
var s = document.getElementsByTagName(‘script’)[0]; s.parentNode.insertBefore(ga, s);
})();
</script>

You’ll have to replace the account ID (UA-XXXXX-X) by your own.

This code snippet will work as well as the old one and will not wait for the end of the script to be loaded since it’s in the <head> of the document.

In order to track events on your page, let’s say clicks on links, I’ll add a function to this script :


<script type=”text/javascript”>
var _gaq = _gaq || [];
_gaq.push(['_setAccount', 'UA-XXXXX-X']);
_gaq.push(['_trackPageview']);
(function() {
var ga = document.createElement(‘script’); ga.type = ‘text/javascript’; ga.async = true;
ga.src = (‘https:’ == document.location.protocol ? ‘https://ssl’ : ‘http://www’) + ‘.google-analytics.com/ga.js’;
var s = document.getElementsByTagName(‘script’)[0]; s.parentNode.insertBefore(ga, s);
})();


function trackClick(text,link,title) {
_gaq.push(['_trackEvent',text,link,title]);
};
</script>

That trackClick function will send information to Google Analytics’s event tracker. The attributes that I pass are :

  • a category : the text of the link
  • an action : the link address
  • label : the title attribute of the link

So, if my page contains a link like :

<a href=”./products.php” title=”Choose one of our products”>Our products</a>

the script will send the following pieces of information if the link is clicked :

  • a category : Our products
  • an action : ./products.php
  • label : Choose one of our products

In order to do so, I’ll invoke JQuery. So first, I’ll have to download jquery.js, upload it to my web server and add the following to the <head> of my document to have JQuery work :

<script type=”text/javascript” src=”jquery.js”></script>

Then I’ll add another script that will trigger my trackClick function when a link is clicked :
<script type=”text/javascript”>
$(document).ready(function(){
$(‘a’).click(function(){
var eventCategory = $(this).attr(‘title’);
var trackURL = $(this).attr(‘href’);
var text = $(this).text();
trackClick(text,trackURL,eventCategory);
});
});
</script>

You’ll have to wait a while for Google Analytics to display your events but once it’s done, it can give you the following results :

Event tracking Google Analytics

You can browse the data per categories, per actions or per labels.

Webliography

Google’s Event Tracking Guide

Asynchronous Tracking

Code Igniter, un framework PHP

Choisir un Framework PHP pour développer des sites web peut vous faire gagner des efforts et du temps. Je ne désire pas écrire ici une liste exhaustive des avantages et inconvénients des différents frameworks PHP disponibles mais veut simplement mettre en évidence pourquoi je crois qu’ils valent la peine qu’on les essaie.

Dans mon cas personnel, le choix d’un framework PHP m’a aussi aidé à acquérir une meilleure pratique de programmation.

Code Igniter - PHP FrameworkKohana - PHP5 FrameworkZend Framework

Le framework avec lequel j’ai développé plusieurs projets Web est Code Igniter (v.1.7.2). J’ai aussi approché Kohana3 (pour le plaisir) parce que je cherchais un framework léger et PHP5 strict. Je n’ai pas approfondi Zend Framework parce qu’il m’a l’air un peu lourd et je cherche un système plus léger. Cela dit, produit développé par Zend Technologies Ltd., il est également une référence dans le domaine des Frameworks PHP.

Si vous ne vous êtes jamais frotté à un framework PHP et être prêt à jeter un oeil à oeil en quelques minutes, visionnez un des tutoriels vidéos officiels sur http://codeigniter.com/tutorials/ : absolument convaincant!

Au départ, j’étais assez frileux de choisir un framework et préférais coder mes propres scripts parce que je pensais qu’un framework me forcerais à utiliser une pratique de programmation que je pourrais regretter ultérieurement (utiliser des règles de programmation propres au framework, efficacité à long terme,…). Tel était mon état d’esprit avant d’en avoir essayé un.

Après ma première expérience avec Code Igniter, j’ai changé d’avis et pense désormais que les framework nous facilitent la vie. Et même si le framework que j’ai choisi n’était plus développé, je pourrais aisément en choisir un autre pour développer mes sites web sans devoir révolutionner ma pratique.

Selon moi, ce qui rend un framework crédible, efficace est :

  • un framework PHP5
  • une architecture MVC (Modèle-Vue-Contrôler)
  • un lot de helpers (scripts qui vous font gagner du temps car ils contiennent des classes pour gérer les urls ou les éléments de formulaire, par exemple)
  • la possibilité de scripter vos propres contrôleurs, vos propres bibliothèques de classes, vos propres helpers
  • une pratique bien documentée (off- et/ou online)
  • un système léger (donc au chargement rapide)

Tout est une question de puissance…

PHP5-powered

La puissance de framework PHP5 comme Kohana est qu’ils sont strictement OOP (Object Oriented Programming), signe d’une meilleure pratique de programmation. Code Igniter est partiellement écrit en PHP5 OOP, les helpers n’incluent pour l’instant que des fonctions PHP4.

MVC-powered

Une architecture MVC vous permet de structurer votre code : vos scripts PHP ne sont plus mêlés à votre HTML et vos requêtes MySql comme ils l’étaient dans des scripts faits maison sans framework. Dans une architecture MVC, vous pouvez définir des répertoires spécifiques qui contiendront vos classes de contrôleurs, vos classes de modèles et vos vues. Pratiquement parlant, une page Web appellera un contrôleur. Ce contrôleur peut définir des variables, appeler un modèle qui se connectera à la base de données pour en extraire des données, par exemple. Donc, le modèle exécute une requête MySql, obtient les données de la base de données et renvoie le résultat au contrôleur. Le contrôleur passera ensuite les résultats à la vue qui est comme un template HTML.

MY_Controller.php : écrire vos propres contrôleurs

Un Framework PHP vous laisse scripter vos propres contrôleurs. Dans Code Igniter, le contrôleur principal se trouve dans /system/libraries/Controller.php. Pour utiliser votre propre contrôleur, créez un fichier dans /system/application/libraries/MY_Controller.php. Ce fichier contient une classe MY_Controller qui étend le contrôleur principal :

<?php if ( ! defined(‘BASEPATH’)) exit(‘No direct script access allowed’);
class MY_Controller extends Controller {
public function __construct() {
parent::__construct();
$this->load->helper(array(‘my_html’,'my_url’,'my_date’));
}
}
?>

Mon contrôleur personnel charge le constructeur du contrôleur principal puis charge quelques helpers. Ces helpeurs ne sont pas les helpers par défaut de Code Igniter qui se trouvent dans /system/helpers/ mais mes propres helpers réécrits : my_html_helper.php, my_url_helper.php et my_date_helper.php qui sont des copies des helpers originaux auxquels j’ai ajouté quelques fonctions personnelles.

Développer des sites Web avec Code Igniter m’a permis d’écrire des scripts très courts, faciles à mettre à jour et redoutablement efficaces.

Webliography

Code Igniter

Code Igniter Video Tutorials

Code Igniter Tutorials

Derek Allard’s tutorials

Kohana

Code Igniter, a PHP Framework

Choosing a PHP Framework to develop websites can save you time and efforts. I’m not writing this post to write an exhaustive list of the pros and cons of different PHP frameworks but just want to highlight why I think PHP frameworks are worth trying.

In my very case, it has also led me to better programming practises.

Code Igniter - PHP FrameworkKohana - PHP5 FrameworkZend Framework

The framework I’ve developed entire projects with is Code Igniter (v.1.7.2). I have also had a go with Kohana3 (just for fun) because I was looking for a strict PHP5 lightweight framework. I have not got very deep into Zend Framework because it looks a bit heavyweight for my purposes. However, it is developed by Zend Technologies Ltd., the reference in terms of web-based PHP applications.

If you have never tried a PHP framework and are ready to view how it works in a few minutes, just try one of the official video tutorials on http://codeigniter.com/tutorials/ : strictly astonishing!

At first, I was a bit reluctant to choose a framework and preferred coding my own scripts because I tought starting to use a framework would force me into a practise I could later regret (use of coding rules imposed by the framework itself, efficiency in the long term…). This was my first thought before ever trying one.

After my first Code Igniter experience, I have changed my mind and now think they make my life easier. And even if the framework I have chosen was no longer maintained, I could easily choose another framework to develop my new websites without changing so much my programming practise.

In my opinion, the following features make a good and efficient framework :

  • a PHP 5 framework
  • an MVC (Model-View-Controller) architectural pattern
  • a set of helpers (scripts that save you time for managing urls, or form elements, for example)
  • the possibility to script your own controllers, libraries, helpers
  • a well-documented practise
  • a lightweight (thus fast loading) system

It’s all a question of powers…

PHP5-powered

The power of PHP5 frameworks like Kohana is they’re strictly OOP (Object Oriented Programming), a proof of better programming practises. Code Igniter is partly written in PHP5, helpers including PHP4 functions.

MVC-powered

The power of an MVC architectural pattern is that it allows you to structure your code : your PHP scripts are not mixed anymore with Html and MySql requests as they would be in a home-made script without a framework. In a Model-View Controller pattern,you may define specific folders to hold your controller classes, your models classes and your views. Practically speaking, a web page will call a controller. This controller may define variables or call a model to retrieve data from a database, for example. So, the model will execute the MySql query, get the data from the database and return the result to the Controller. The controller will then pass the results to the view which is like an Html template.

MY_Controller.php : writing your own controllers

A PHP Framework lets you write your own controllers. In Code Igniter, the main controller is in /system/libraries/Controller.php. Code Igniter lets you write your own controller. You should name it /system/application/libraries/MY_Controller.php. This file contains a MY_Controller class that actually extends the main Controller class :

<?php if ( ! defined(‘BASEPATH’)) exit(‘No direct script access allowed’);
class MY_Controller extends Controller {
public function __construct() {
parent::__construct();
$this->load->helper(array(‘my_html’,'my_url’,'my_date’));
}
}
?>

My personal controller here loads the Main Controller constructor and then loads some helpers. These helpers are not the default CI helpers that can be found in /system/helpers/ but my own rewritten helpers : my_html_helper.php, my_url_helper.php and my_date_helper.php which are copies of the original helpers to which I have added some personal functions.

Scripting websites with Code Igniter has led me to write scripts which are very short, easy to manage and wonderfully efficient.

Webliography

Code Igniter

Code Igniter Video Tutorials

Code Igniter Tutorials

Derek Allard’s tutorials

Kohana

Pages merci en formulaires PHP

Google Analytics filter page names

J’avais l’habitude de scripter des formulaires de login, de contact, d’inscription, de commande,… qui étaient affichés dans une page login.htm, contact.htm, inscription.htm, commande.htm avec un attribut “action” de formulaire qui renvoyait à cette même page. Une fois le formulaire envoyé, PHP validait les champs de formulaires et affichait un message de remerciement (ou un message d’erreur) à l’intérieur de la même page html. Cette méthode n’est pas idéale si vous désirez pister les utilisateurs qui ont complété les utilisateurs qui ont rempli le formulaire correctement, ou ceux qui ont abandonné l’action en cours de remplissage ou ceux qui l’ont rempli de manière erronée et l’on envoyé à nouveau…

Si vous voulez analyser plus profondément les statistiques liées à votre site grâce à un outil comme Google Analytics, par exemple, il serait plus judicieux de générer une page login-merci.htm, contact-merci.htm, inscription-merci.htm ou commande-merci.htm. Une fois le formulaire envoyé, faites valider les champs par PHP à l’aide d’une classe validation de formulaire (vérifiez les champs requis, les champs email,…) et redirigez l’utilisateur vers une page “merci” pour afficher le message de remerciement si les champs ont été correctement complétés. Si ce n’est pas le cas, redirigez l’utilisateur vers la page contact-erreur-email.htm, par exemple.

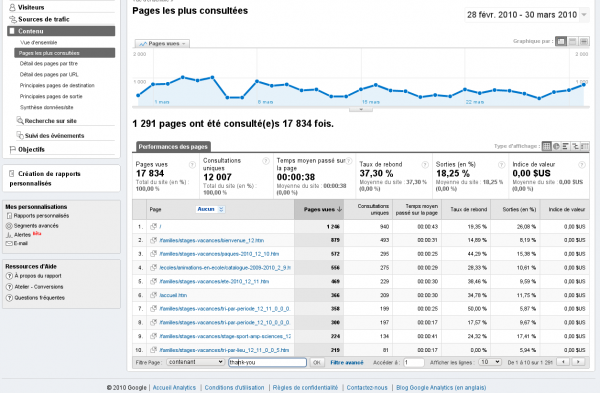
Après quelque temps, vous vous loggerez sur votre compte Google Analytics / Contenu / Rapport Complet : utilisez le champ filtre en bas du rapport pour filtrer les pages par “contenant le mot-clef” ou “ne contenant pas le mot-clef” avec une valeur comme “merci” pour afficher toutes les pages contenant ce mot-clef et afficher les statistiques de ces pages.

PHP forms thank-you pages

Google Analytics filter page names

I used to script login forms, contact forms, registration forms, order forms,… that were displayed in a login.htm, contact.htm, register.htm, order.htm with the forms action attributes set to the same url. Once submitted, PHP checked the form fields and displayed a thank you message (or an error message) within the same html page. This is not the right way to do it if you want to track users that filled in the form correctly or the ones who abandoned filling in the form or the ones who filled it incorrectly and submitted it again…

If you want to get deeper into the statistics of your website thanks to Google Analytics tools, for example, it may be wiser to generate login-thank-you.htm, contact-thank-you.htm, register-thank-you.htm or order-thank-you.htm. Once the form is submitted, have PHP check what has to be checked through a form validation class (check for required fields, email fields,…) and redirect the user to the thank-you-page to display the thank you message if he filled it in correctly. If this is not the case, redirect him to a contact-error-email.htm page for example.

After some time, you’ll go to Google Analytics / Content / Full report : use the filter field at the bottom of the page to filter by “containing keyword” or “not containing keyword” with a value like ‘thank-you’ to display all pages containing those keywords and get statistics about those pages.

ClickHeat – alternative Crazy Egg

clickheat

Crazy Egg offre un outil d’Heat Mapping qui vous permet de visualiser les clics des visiteurs de votre site web. Vous devrez vous inscrire pour profiter de cet outil et payer entre $9 et $99 selon le pack choisi.

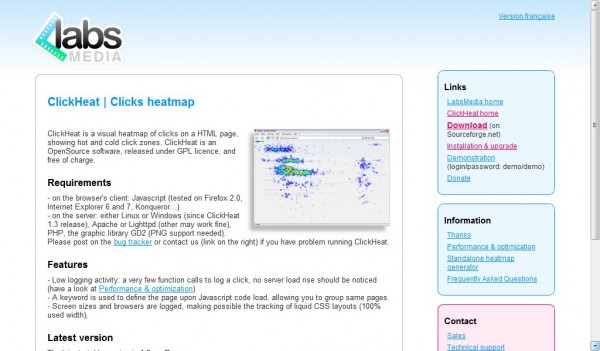
Un autre outil similaire puissant est Clickheat. Il est gratuit, Open Source et facile à installer (30 secondes d’implementation).

Uploadez simplement le répertoire clickheat décompressé dans le root de votre site. Puis suivez l’assistant de configuration. Vous devrez indiquer quels noms de domaine sont autorisés à indexer les clics et définir le login-password d’accès aux données. Puis identifiez-vous sur http://www.mydomain.com/clickheat/ et générez le code javascript à placer dans la balise head de votre fichier index.php.

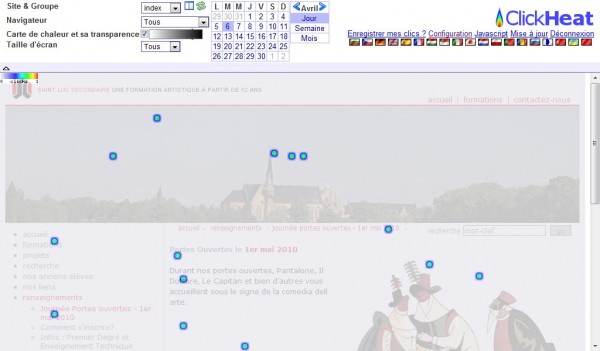
Après quelques clics de visiteurs, vous obtiendrez les résultats suivants :

clickheat

ClickHeat – Crazy Egg alternative

clickheat

Crazy Egg provides you with Heat Mapping tools that lets you visualize your visitors’ clicks on your website. You need to register for that tool and pay $9 to $99 according to the pack you choose.

Another powerful tool is Clickheat. It’s free and Open Source. It is easy to configure and will take you 30 seconds of implementation.

You simply upload the extracted clickheat directory to the root of your website. Then follow the configuration wizard. You’ll have to set the domain names that are allowed to trigger a clickheat indexation and to set a login-password to get to the results. Then login to http://www.mydomain.com/clickheat/ and generate the javascript code to be pasted in the head of your index.php file.

After some visitors’ clicks, you’ll get the following results :

clickheat