![]() Après avoir passé beaucoup de temps en PHP orienté objet et choisi Codeigniter comme mon premier framework PHP, j’ai décidé de me mettre au Framework Zend qui est sans doute moins léger mais a une vocation plus universelle et est très bien documenté.
Après avoir passé beaucoup de temps en PHP orienté objet et choisi Codeigniter comme mon premier framework PHP, j’ai décidé de me mettre au Framework Zend qui est sans doute moins léger mais a une vocation plus universelle et est très bien documenté.
Téléchargement de (ZF) et installation locale sous MAC OSX MAMP
J’utilise MAMP sur Mac OSX. J’ai modifié le document root de MAMP (/Applications/MAMP/htdocs par défaut) en :
DocumentRoot “/Users/my_name/Sites”
dans le fichier /Applications/MAMP/conf/apache/httpd.conf
Ainsi, tous mes projets PHP se trouvent dans /Users/my_name/Sites/. C’est le répertoire où je vais installer ZF.
Tout d’abord, téléchargez ZF à partir de http://framework.zend.com/download/latest ou suivez le lien “Download Now” à partir de la page d’accueil Zend. J’ai choisi le Zend Framework 1.11.11 Full. Décompressez le fichier téléchargé dans votre serveur local : /Users/my_name/Sites/ZF/ dans mon cas.
Vous devez modifier votre fichier php.ini pour déclarer le chemin vers la library Zend, qui sera nécessaire pour faire fonctionner l’application que vous créerez. Ouvrez le fichier php.ini (/Applications/MAMP/conf/PHPX.X/php.ini ou parcourez le répertoire /Applications/MAMP/ pour le trouver (PHPX.X symbolise la version de PHP qu’utilise votre MAMP)) à l’aide de TextEdit.app et modifiez la valeur de l’include_path :
;include_path = “.:/Applications/MAMP/bin/php5.3/lib/php” Cette ligne a été commentée (par l’utilisation de “;” en début de ligne) et remplacée par la ligne suivante :
include_path = “.:/Applications/MAMP/bin/php5.3/lib/php:/Users/olivier/Sites/ZF/library”
N’oubliez pas de redémarrer MAMP après modification de votre include_path.
Créer un projet ZF via le Terminal
Ouvrez une fenêtre Terminal (/Applications/Utilitaires/Terminal). Utilisez ensuite la commande suivante pour vous placer dans le Document Root de MAMP :
cd /Users/my_name/Sites
Puis tapez la commande suivante :
/Users/my_name/Sites/ZF/bin/zf.sh create project my_zend
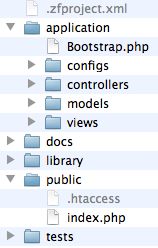
Le script shell ZF sera exécuté et générera le répertoire /Users/my_name/Sites/my_zend/ avec l’arborescence suivante :

Le répertoire application contient des fichiers structurés en MVC. Si vous avez déjjà approché un framework tel que Codeigniter, vous savez ce que cela signifie :
- Models : contiendront les fichiers de requêtes à la base de données
- Views : contiendront les fichiers d’Html et Css
- Controllers : recevront les requêtes des clients, les traiteront, feront des appels aux modèles et enverront les données traitées aux vues.
Le seul répertoire qui doit être accessible aux internautes est le répertoire public.
Utiliser les VirtualHosts sous MAMP
L’usage des hôtes virtuels peut s’avérer très utile. En effet, dans la configuration de MAMP par défaut, vous appelez un de vos projets via une url du type :
http://localhost:8888/my_zend (8888 étant le port http par défaut dans MAMP).
Il est possible de raccourcir cette url et d’utiliser http://my_zend:8888. Personnellement, j’utilise un suffixe : http://my_zend.local:8888 comme hôte virtuel pour ne pas mélanger les domaines du web avec les domaines locaux.
Pour y parvenir, vous devrez modifier 2 fichiers : /private/etc/hosts et /Applications/MAMP/conf/apache/httpd.conf. Ces fichiers sont importants, je vous conseille donc d’en effectuer une sauvegarde via le Terminal en utilisant la commande suivante :
cp /private/etc/hosts /private/etc/hosts.bak
et
cp /Applications/MAMP/conf/apache/httpd.conf /Applications/MAMP/conf/apache/httpd.conf.bak
Dans le terminal, tapez :
sudo nano /private/etc/hosts
Vous devrez ensuite taper le mot de passe du Super Utilisateur Mac et pourrez modifier les hôtes. Utilisez les flèches du clavier pour atteindre la dernière ligne du fichier et tapez :
127.0.0.1 my_zend.local
Puis pressez [CTRL + o] pour enregistrer la modification.
Puis ouvrez le fichier /Applications/MAMP/conf/apache/httpd.conf à l’aide de TextEdit.app et ajoutez les lignes suivantes en fin de fichier :
NameVirtualHost my_zend.local

<VirtualHost my_zend.local>

DocumentRoot "/Users/my_name/Sites/my_zend/public"

ServerName my_zend.local

</VirtualHost>
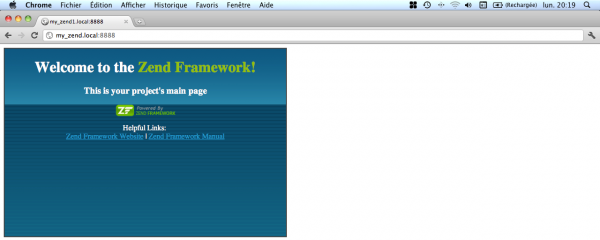
Vous venez de créer un hôte virtuel. Redémarrez MAMP pour prendre ces modifications en compte et tapez http://my_zend.local:8888 dans votre navigateur favori :

Jetez un oeil au code source de cette page Html : les balises <html>, <head> et <body> sont absentes. Nous allons activer le layout dans ZF pour pouvoir définir ces balises pour toutes nos pages.
Activer layout dans ZF
Ouvrez une fenêtre Terminal et tapez le chemin de votre projet ZF :
cd /Users/my_name/Sites/my_zend/
Puis tapez la commande suivante pour activer le layout :
/Users/my_name/Sites/ZF/bin/zf.sh enable layout
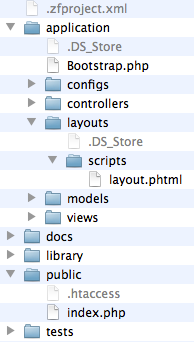
Remarquez la structure du répertoire /application/layout qu’a généré le script shell ZF :

Le fichier /application/configs/application.ini a aussi été modifié pour pointer le répertoire de layout
Pour avoir une déclaration XHTML Doctype correcte, nous devez initialiser l’objet view car déclarer le doctype appellera une vue. Modifiez le fichier /application/configs/application.ini et ajoutez la ligne suivante en bas de la section [production] :
resources.view[] = ""
Puis déclarez le doctype dans /application/Bootstrap.php :
class Bootstrap extends Zend_Application_Bootstrap_Bootstrap

{

protected function _initDoctype()

{

$this->bootstrap('view');

$view = $this->getResource('view');

$view->doctype('XHTML1_STRICT');

}

}
This being done, you can fill the file /application/layouts/scripts/layout.phtml with the following :
<!-- application/layouts/scripts/layout.phtml -->

<?php echo $this->doctype() ?>

<html xmlns="http://www.w3.org/1999/xhtml">

<head>

<meta http-equiv="Content-Type" content="text/html; charset=utf-8" />

<title>Zend Framework Quickstart Application</title>

<?php echo $this->headLink()->appendStylesheet('/css/global.css') ?>

<script src="https://ajax.googleapis.com/ajax/libs/jquery/1.6.4/jquery.min.js"></script>

</head>

<body>

<div id="header" style="background-color: #EEEEEE; height: 30px;">

<div id="header-logo" style="float: left">

<b>ZF Quickstart Application</b>

</div>

<div id="header-navigation" style="float: right">

<a href="<?php echo $this->url(

array('controller'=>'index'),

'default',

true) ?>">Index</a>

</div>

</div>

<?php echo $this->layout()->content ?>

</body>

</html>
Le code source des pages HTML générées contient désormais toutes les balises nécessaires.
Copier le répertoire Zend library
Les librairies ZF se trouvent dans le répertoire téléchargé /ZF/library/Zend/. Copiez le répertoire Zend et collez-le dans votre projet : /Users/my_name/Sites/library/ de sorte qu’il contienne le répertoire zend.
Webliography
Zend Framework in action (Livre – English)
Zend Framework – Bien débuter en PHP (Livre en français)
Survive the deep end – Zend Book en ligne
Tutoriel Zend par Rob Allen (tuto 3 étoiles)