JQuery pour masquer ou afficher des champs de formulaires

JQueryJQuery est un framework Javascript qui a révolutionné la manière dont ont peut générer des événements côté client. L’interaction entre Javascript et HTML est devenue beaucoup plus aisée et standardisée grâce à JQuery.

Dans cet article, je montre comment gérer l’affichage de champs de formulaire grâce à JQuery.

La clef de JQuery réside dans la balise <head> de votre document. JQuery.js est un fichier javascript qui contient les fonctions principales. J’en ai téléchargé la version allégée (72 Ko) à partir de JQuery.com

<script type=”text/javascript” src=”./js/jquery-1.4.2.min.js”></script>

La liste déroulante (select) fait afficher des champs de formulaire

Mon premier exercice est de laisser JQuery afficher des champs de formulaire si une valeur particulière d’un champ liste déroulante est sélectionnée.

Voici mon formulaire HTML avec 3 éléments : 2 listes déroulantes (id = type et id = choix) et un textarea (id = text) :

<form>
<select id=”type”><option>choix de type</option><option value=”1″>type 1</option><option value=”2″>type 2</option><option value=”3″>type 3</option></select><br />
<select id=”choix”><option>choix</option><option value=”1″>choix 1</option><option value=”2″>choix 2</option><option value=”3″>choix 3</option></select><br />
<textarea id=”text”></textarea>
</form>

L’affichage de cette page dans un navigateur affichera les 3 éléments (2 listes déroulantes et le champs textarea).

Mon objectif est d’afficher seulement la première liste déroulante (id = type) et de seulement afficher la seconde liste déroulante et le textarea si la troisième entrée de la première liste déroulante est sélectionnée.

Dans la <head> de mon document, j’ajoute un script qui commence avec la fonction $(document).ready(). Ceci vous permet de charger autant de fonctions que nécessaire dès que le DOM est chargé et avant que le contenu de votre page ait été chargé. Vous pourriez- enregistrer cette fonction à l’intérieur d’un fichier .js séparé et le pouvoir de JQuery est que vous n’aurez rien d’autre à ajouter au contenu HTML de votre document :

<script language=”javascript”>//<![CDATA[

$(document).ready(function() {

$("#choix").hide();

$("#text").hide();

$("#type").change(function() {

if ( $("#type").val() == "3"){

$("#choix").show();

$("#text").show();

}

else{

$("#choix").hide();

$("#text").hide();

}

});

if ( $("#type").val() == "3"){

$("#choix").show();

$("#text").show();

}

$("#choix").change(function() {

var val = $("#choix").val();

$("#text").append(val + "\n");

});

});

//]]></script>

Vous devriez aisément compendre ce que ce script fait : la liste déroulante “choix” et le champ textarea sont masqués par défaut. JQuery a accès aux éléments de formulaire grâce à leur id (#choix, par exemple). Si la valeur de la liste déroulante “type” est 3, les autres éléments du formulaire seront affichés, sinon, ils seront masqués. Puis si lma valeur de la liste déroulante “choix” change, sa valeur sera ajoutée au contenu du champ textarea.

La case à cocher (checkbox) fait afficher des champs de formulaire


Mon second exercice est de laisser JQuery identifier si une case à cocher (checkbox) est cochée pour faire afficher ou masquer des champs de formulaire.

J’ajoute un champ checkbox à mon formulaire HTML :


<form>
<input type=”checkbox” id=”check” />
<select id=”type”><option>choose a type</option><option value=”1″>type 1</option><option value=”2″>type 2</option><option value=”3″>type 3</option></select><br />
<select id=”choice”><option>choice</option><option value=”1″>choice 1</option><option value=”2″>choice 2</option><option value=”3″>choice 3</option></select><br />
<textarea id=”text”></textarea>
</form>

Puis je modifie le script de ma balise <head> pour identifier si la case a été cochée ou non :

<script language=”javascript”>//<![CDATA[

$(document).ready(function() {

$("#choix").hide();

$("#text").hide();

$("#type").change(function() {

if ( $("#type").val() == "3"){

$("#choix").show();

$("#text").show();

}

else{

$("#choix").hide();

$("#text").hide();

}

});

if ( $("#type").val() == "3"){

$("#choix").show();

$("#text").show();

}

$("#check").change(function() {

if($("#check").attr("checked")) {

$("#choix").show();

$("#text").show();

}

else{

$("#choix").hide();

$("#text").hide();

}

});

$("#choix").change(function() {

var val = $("#choix").val();

$("#text").append(val + "\n");

});

});

//]]></script>

Avec JQuery, vous pourrez aussi ajouter quelques effets à la “scriptaculous” avec ces actions show et hide :

$(“#choix”).show(“slow”);

affichera l’élément de formulaire lentement.

Vous pourriez aussi utiliser une valeur numérique :

$(“#choix”).hide(200);

Webliography :
JQuery.com

JQuery to show or hide form fields

JQueryJQuery is a javascript library that has revolutionized the way we can trigger client-side events. Having Javascript interact with HTML has become much easier and also more standard thanks to that framework.

In this post, I’ll tackle displaying form elements thanks to JQuery.

The key to JQuery lies in the <head> of your document. JQuery.js is a javascript file that contains the main functions. I’ve downloaded the minified version (72 Ko) from JQuery.com

<script type=”text/javascript” src=”./js/jquery-1.4.2.min.js”></script>

Display form fields on change select box value :

My first exercise is to let JQuery identify the select box value which is selected to display or hide extra form fields.

So, here’s my HTML form with 3 elements : 2 select boxes (id = type and id = choice) and a textarea (id = text) :

<form>
<select id=”type”><option>choose a type</option><option value=”1″>type 1</option><option value=”2″>type 2</option><option value=”3″>type 3</option></select><br />
<select id=”choice”><option>choice</option><option value=”1″>choice 1</option><option value=”2″>choice 2</option><option value=”3″>choice 3</option></select><br />
<textarea id=”text”></textarea>
</form>

Displaying such a form in a browser will display the 3 elements (2 select boxes and the textarea).

My objective is to show the first select box only (id = type) and to only display the second select box and the textarea if the third item of the first select box is selected.

So, in the <head> of my document, I’ll add a script that starts with the $(document).ready() function. This allows you to load as many functions as necessary as soon as the DOM is loaded and before the loading of the contents of your page. You could store this function inside a separate .js file and the power of JQuery is you won’t have to add anything to your HTML content :

<script language=”javascript”>//<![CDATA[

$(document).ready(function() {

$("#choice").hide();

$("#text").hide();

$("#type").change(function() {

if ( $("#type").val() == "3"){

$("#choice").show();

$("#text").show();

}

else{

$("#choice").hide();

$("#text").hide();

}

});

if ( $("#type").val() == "3"){

$("#choice").show();

$("#text").show();

}

$("#choice").change(function() {

var val = $("#choice").val();

$("#text").append(val + "\n");

});

});

//]]></script>

So you’ll easily guess what that script does : the “choice” select box and the textarea are set to hidden by default. JQuery here accesses the form element thanks to their id (#choice, for example). If the value of the “type” select box is set to 3, the other form elements are shown, if not, they’re hidden. Then if the value of the “choice” select box is changed, its value will be added to the textarea content.


Display form fields on change checkbox :

My second exercise is to let JQuery identify if a checkbox is ticked to display or hide form fields.

I’ll add a checkbox to my HTML form :


<form>
<input type=”checkbox” id=”check” />
<select id=”type”><option>choose a type</option><option value=”1″>type 1</option><option value=”2″>type 2</option><option value=”3″>type 3</option></select><br />
<select id=”choice”><option>choice</option><option value=”1″>choice 1</option><option value=”2″>choice 2</option><option value=”3″>choice 3</option></select><br />
<textarea id=”text”></textarea>
</form>

Next I’ll modify the script in my <head> tag to handle checkbox ticking (or not) :

<script language=”javascript”>//<![CDATA[

$(document).ready(function() {

$("#choice").hide();

$("#text").hide();

$("#type").change(function() {

if ( $("#type").val() == "3"){

$("#choice").show();

$("#text").show();

}

else{

$("#choice").hide();

$("#text").hide();

}

});

if ( $("#type").val() == "3"){

$("#choice").show();

$("#text").show();

}

$("#check").change(function() {

if($("#check").attr("checked")) {

$("#choice").show();

$("#text").show();

}

else{

$("#choice").hide();

$("#text").hide();

}

});

$("#choice").change(function() {

var val = $("#choice").val();

$("#text").append(val + "\n");

});

});

//]]></script>

With JQuery, you’ll also have some “scriptaculous” effects with show and hide actions :

$(“#choice”).show(“slow”);

will slowly display your form element.

You could also use a numeric value :

$(“#choice”).hide(200);

Webliography :

JQuery.com

JQuery event tracker for Google Analytics

Google Analytics is the ultimate tool if you want to get some trustworthy statistics about the hits on your website. It will easily give you statistics about your visitors, about the sources of traffic to your site and about pageviews.

This is fairly useful if you want general information about who comes to your site and what pages are viewed most.

Another useful tool is the event tracker which is accessible under Menu Content / Event Tracker.

Asynchronous Tracking

In order to finalize your Google Analytics Account, you need to copy-paste Google tracking code snippet to the bottom of your pages (just before the </body> tag).

Google Analytics suggests you erase that code at the end of your page and replace it by an asynchronous tracking code to be pasted in the <head> of your document :

<script type=”text/javascript”>
var _gaq = _gaq || [];
_gaq.push(['_setAccount', 'UA-XXXXX-X']);
_gaq.push(['_trackPageview']);
(function() {
var ga = document.createElement(‘script’); ga.type = ‘text/javascript’; ga.async = true;
ga.src = (‘https:’ == document.location.protocol ? ‘https://ssl’ : ‘http://www’) + ‘.google-analytics.com/ga.js’;
var s = document.getElementsByTagName(‘script’)[0]; s.parentNode.insertBefore(ga, s);
})();
</script>

You’ll have to replace the account ID (UA-XXXXX-X) by your own.

This code snippet will work as well as the old one and will not wait for the end of the script to be loaded since it’s in the <head> of the document.

In order to track events on your page, let’s say clicks on links, I’ll add a function to this script :


<script type=”text/javascript”>
var _gaq = _gaq || [];
_gaq.push(['_setAccount', 'UA-XXXXX-X']);
_gaq.push(['_trackPageview']);
(function() {
var ga = document.createElement(‘script’); ga.type = ‘text/javascript’; ga.async = true;
ga.src = (‘https:’ == document.location.protocol ? ‘https://ssl’ : ‘http://www’) + ‘.google-analytics.com/ga.js’;
var s = document.getElementsByTagName(‘script’)[0]; s.parentNode.insertBefore(ga, s);
})();


function trackClick(text,link,title) {
_gaq.push(['_trackEvent',text,link,title]);
};
</script>

That trackClick function will send information to Google Analytics’s event tracker. The attributes that I pass are :

  • a category : the text of the link
  • an action : the link address
  • label : the title attribute of the link

So, if my page contains a link like :

<a href=”./products.php” title=”Choose one of our products”>Our products</a>

the script will send the following pieces of information if the link is clicked :

  • a category : Our products
  • an action : ./products.php
  • label : Choose one of our products

In order to do so, I’ll invoke JQuery. So first, I’ll have to download jquery.js, upload it to my web server and add the following to the <head> of my document to have JQuery work :

<script type=”text/javascript” src=”jquery.js”></script>

Then I’ll add another script that will trigger my trackClick function when a link is clicked :
<script type=”text/javascript”>
$(document).ready(function(){
$(‘a’).click(function(){
var eventCategory = $(this).attr(‘title’);
var trackURL = $(this).attr(‘href’);
var text = $(this).text();
trackClick(text,trackURL,eventCategory);
});
});
</script>

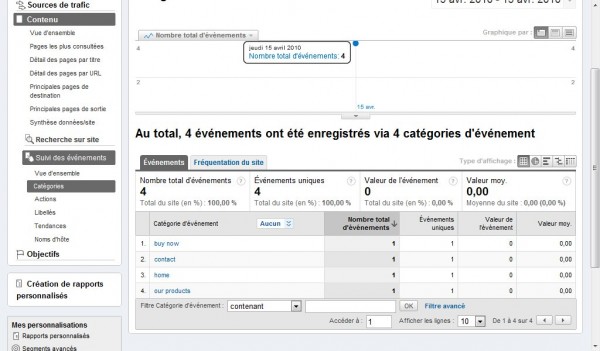
You’ll have to wait a while for Google Analytics to display your events but once it’s done, it can give you the following results :

Event tracking Google Analytics

You can browse the data per categories, per actions or per labels.

Webliography

Google’s Event Tracking Guide

Asynchronous Tracking