Plugins SEO pour WordPress

Wordpress plugins directoryJe pense que WordPress (WP) est la solution de Blog. Sa communauté est toujours grandissante,elle intègre les derniers développements SEO, le nombre de plugins et de thèmes développés est en constante augmentation…

Le référencement de vos articles de Blog WP s’effectue quasiment en temps réel alors qu’un site web conventionnel constatera le passage des bots de manière beaucoup moins fréquente (tous les 15 jours).

Pour améliorer l’indexation ou optimiser votre WP pour les moteurs de recherche, vous devrez installer quelques plugins WP.

Installer des plugins sous WP est hyper-simple. Uploadez le répertoire du plugin décompressé dans votre répertoire WP /wp-content/plugins. Puis activez et cnofigurez le plugin dans votre interface admin WP.

Choisissez les plugins WP à installer avec soin. En effet, certains plugins moins suivis pourraient générer un conflit ou un mauvais fonctionnement après un upgrade de WP, par exemple. Chaque plugin précise avec quelle version de WP il est compatible. En choisissant des plugins populaires, vous éviterez les problèmes de compatibilité. Je vous conseille de rechercher les plugins nécessaires dans le WordPress Plugins Directory (plus de 8.000 plugins disponibles) :

Permaliens

Chacun de vos articles WP reçoit une url unique appelée permalien. Il est généré automatiquement et vous pouvez modifier ce lien manuellement au besoin.

Vous trouverez aussi une page de paramétrage des Permaliens dans l’interface admin WP. Vous devriez utiliser une structure personnalisée pour les url automatiques que WP créera pour chacun de vos articles de blog :

/%category%/%postname%/

créera le permalien suivant : http://www.od2dev.be/php5/polymorphisme : “php5″ étant le titre de la catégorie et “polymorphisme” le titre de votre article. Si votre article a déjà été publié et qu’il est déjà indexé par Google (c’est certainement le cas), et si vous changez votre stratégie de permalien, vos anciennes url d’articles mèneront à un broken link. La solution est dans ce cas précis d’utiliser des redirections 301 à l’aide d’un fichier .htaccess.

Plugin SEO (Search Engine Optimization) : All in One SEO Pack
Optimiser votre blog pour un meilleur ranking auprès des moteurs de recherche vous demande :

  • de nommer vos articles de blog avec minutie,
  • de donner à chacun des articles de votre blog, à chacune de vos pages, un titre et une description uniques
  • d’utiliser les permaliens
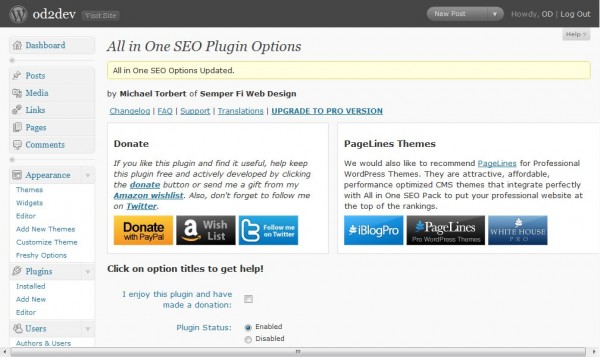
  • d’installer et activer un plugin comme All in One SEO Pack

J’ai choisi le plugin All in One SEO Pack du développeur WP Hallsofmontezuma.

Downloadez simplement l’archive du plugin, décompressez-la et uploadez le répertoire décompressé dans to /wp-content/plugins/. Ensuite, allez dans l’interface admin desplugins de WP et activez All in One SEO Pack. Une fois activé, All in One SEO apparaît dans votre Menu Paramètres WP. Sélectionnez-le et configurez-le :
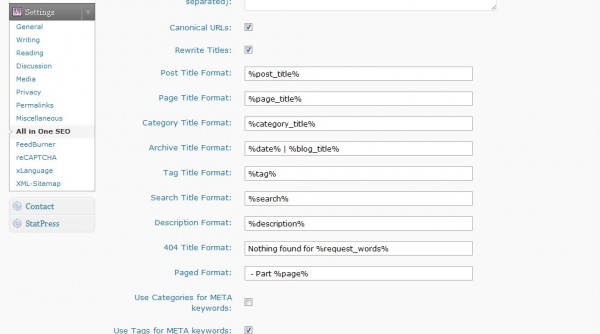
Les tags Titre de Homepage et Description de Homepage doivent être complétés avec les informations que vous désirez voir apparaître dans Google.

Je n’utilise pas le Keywords tag puisque la plupart des moteurs de recherche n’y prêtent plus attention.

Post title format, Page title format et Category title format sons suceptibles d’être indexés dans les moteurs. Paramétrez donc ces champs respectivement avec le post title, page title et category title. Certains thèmes y ajoutent le titre de votre Blog mais si vos articles sont uniques (ce qu’ils devraient être), vous devriez leur donner un titre unique sans les mots-clefs génériques tels que le titre de votre blog.

Le plugin Google Sitemap Generator

Un sitemap XML est un fichier qui devrait se trouver quelque part dans votre répertoire de site web et qui peut être envoyé à Google à travers les Webmastertools, par exemple, et qui aidera Google à mapper votre site. La génération d’un tel fichier peut être automatisé sous WP grâce au Google XML Sitemap Generator (WordPress Plugin). Il est aussi facile à installer et configurer que le plugin ci-dessus.

Texte Alternatif – Titres de liens
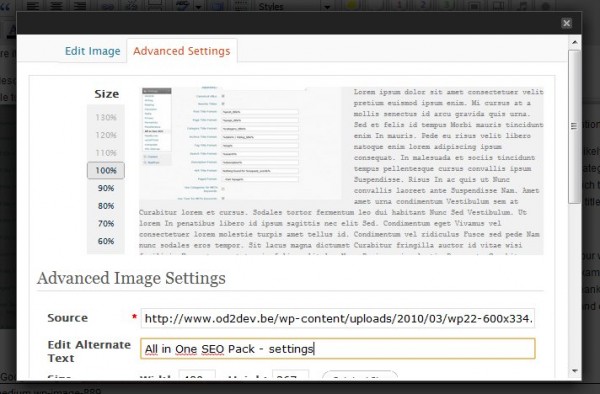
Edit alternate text field for images in WordPressVous pourriez obtenir des hits de Google Images si vous preniez la peine de compléter le champ “texte alternatif” des images. Insérez une image dans votre article, cliquez sur le bouton “éditer” de l’image et allez dans l’onglet “Paramètres Avancés”, puis remplissez le champ “Texte alternatif”.

La même fenêtre de paramètres vous permet de paramétrer le lien sur l’image. N’oubliez pas d’y ajouter un titre.

Webliographie :

All in One SEO Pack (WordPress Plugin)

Google Sitemap Generator (WordPress Plugin)
SEO for Blogs (YouTube video)

WordPress SEO Plugins

Wordpress plugins directory

I believe WordPress (WP) is the Blog solution. Its community is constantly growing, it integrates the latest SEO developments, the number of plugins and themes developed is constantly increasing…

Your WP Blog posts indexation by Google is a real-time indexation which is a real improvement compared to the time which is necessary to update indexation of common websites (15 days).

In order to improve indexation or optimize your WP for search engines, you’ll need to install some WP plugins.

Installing plugins in WP is (dead-)easy. You simply have to upload the extracted plugin directory into your WP /wp-content/plugins directory. Then you’ll activate and configure the plugin in your WP admin interface.

Take a close look at what plugin you choose before installing. Indeed, some of them may generate a conflict after upgrading WP, for example. Each plugin states some requirements concerning the WP version with which it is compatible. By choosing state-of-the-art plugins, you’ll have less compatibility problems. I advise you to look for the necessary plugins in the WordPress Plugins Directory (more than 8,000 available plugins) :


Permalinks

Each of your post in WP receives a unique url which is called permalink. It is generated automatically and you can modify it to suit your requirements.

You’ll also find a Permalinks settings page in your WP Admin interface. You should use a custom structure for the automatic url that WP creates for each of your blog posts.

/%category%/%postname%/

will create the following permalink : http://www.od2dev.be/php5/polymorphism : “php5″ being the category title and “polymorphism” the title of your post. If your blog post has already been published and is listed in Google (which is surely the case), and if you change your permalinks strategy, your old blog post url will lead to a broken link. So the solution in that case is to use 301 redirects through an .htaccess file.

Plugin for SEO (Search Engine Optimization) : All in One SEO Pack

Optimizing your blog for better search engine ranking requires you :

  • to name your blog posts thoroughly,
  • to give each blog post or page a unique title and description
  • to use permalinks
  • to install and activate a plugin like All in One SEO Pack

I chose the plugin All in One SEO Pack from WP developer Hallsofmontezuma.

Simply download the plugin archive, extract it and upload the plugin directory to /wp-content/plugins/. Then go to your WP plugins admin interface and simply activate All in One SEO Pack. Once it has been activated, All in One SEO appears in your WP Settings Menu. Select it and configure it :

All in One SEO Pack - settings

The home title and home description tags need to be completed with the pieces of information you want Google to list.

I don’t use keywords since most search engines don’t pay attention to it anymore.

Post title format, Page title format and Category title format are likely to rank in search results so you’d better set them to the post title, page title and category title. Some themes add the blog title to it but if your individual posts are unique (which they should be), give them a unique title without generic keywords such as your blog title.

Google Sitemap Generator Plugin

An XML sitemap is a file that should be stored somewhere in your website directory, that can be submitted to Google through the Webmastertools, for example, and that will help Google mapping your website. This can be automated in WP thanks to the Google XML Sitemap Generator (WordPress Plugin). It is as easy to install and configure as the above plugin.

Alternate text – Link titles

Edit alternate text field for images in WordPressYou could trigger hits from Google Images if you complete the alternate text field for images. So, insert an image in your post, click on the Edit button on the image and go to the “Advanced settings tag”, then fill in the alternate text field.

The same image settings tab also allows you to modify link settings. If you want to put a link on your image, don’t forget to edit the Advanced Link Settings and set a title to your link.


Webliography :

All in One SEO Pack (WordPress Plugin)

Google Sitemap Generator (WordPress Plugin)

SEO for Blogs (YouTube video)

Serveurs Web locaux

Un développeur web travaillant sur un serveur Linux comme OpenSuse devra simplement activer et configurer Apache, MySql et le support PHP pour faire fonctionner ses sites Web dynamiques.

Si vous travaillez sur une station Windows, vous devrez installer une application Serveur Web pour exécuter vos scripts PHP.

Il y a quelques années, je travaillais avec EasyPhp, qui a un temps cessé d’évoluer. J’ai donc à l’époque changé de solution et choisi WampServer, qui est toujours la solution que j’utilise actuellement. Il est livré avec Apache, Mysql, Phpmyadmin (scripts php pour la gestion de vos bases de données). Il est facile à installer et propose des versions PHP et MySql à jour.

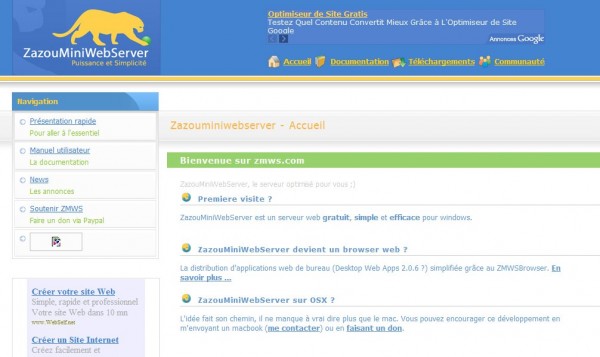
J’ai récemment découvert ZMWS. ZazouMiniWebServer qui est un logiciel serveur Web autonome qui peut être installé sous Windows. Il est livré avec PHP4 et PHP5 mais vous pourriez y ajouter des handlers qui le feront tourner en ASP, PERL,… :

Je l’ai testé aisément sur une clé USB comme serveur Web portable.

Vous pourriez aussi distribuer votre projet Web PHP sur CD et disposer ainsi d’un site web dynamique auto-navigable.

Le site de du projet Open Source ZMWS vous fournira aussi un forum et une documentation.

Webliography :

ZazouMiniWebServer

WampServer

Local Web Servers

As a webdeveloper on a Server Linux distro as OpenSuse, you simply have to activate and configure Apache and MySql.

If you’re working on a Windows station, you need to install a web server application to execute your PHP scripts.

Years ago, I used to work with EasyPhp, which stopped to evolve for some time 3 or 4 years ago. So I switched to WampServer at the time, which is still the one I use daily. It provides you with Apache, Mysql, Phpmyadmin (php scripts to handle your databases). It is really easy to install and has the up-to-date versions of PHP and MySql available.

I’ve recently come across ZMWS. ZazouMiniWebServer is a standalone webserver that can be installed on a Windows machine. It is released with PHP4 and PHP5 but you could also add handlers to make it work with ASP, PERL,… :

I’ve tested ZMWS on a USB stick as a portable web server.

You could distribute your PHP web project on a CD and have an auto-browsable dynamic website.

The website of the ZMWS Open Source project provides you with documentation and a forum.

Webliography :

ZazouMiniWebServer

WampServer

Polymorphisme et PHP5

Le polymorphisme est un concept majeur de la Programmation Orientée Objet (POO). Des langages mûrs tels que C++ ou JAVA intègrent ce concept de manière native. PHP5 permet également d’intégrer le polymorphisme dans le développement PHP.

Qu’est-ce que le polymorphisme?

Son principe réside dans son nom : [poly-] signifie beaucoup et [-morphisme] signifie formes, états. Ainsi, intégrer le polymorphisme dans la programmation permet au développeur d’initialiser un seul objet qui se comportera différemment selon son type. Pratiquement parlant, le développeur écrit une classe de base qui définit les attributs de l’objet et autant de sous-classes que de comportements différents de l’objet seront nécessaires.

Voici un exemple simple de design polymorphique dans le cadre d’un objet véhicule. La classe véhicule a pour attributs des informations qui valent pour tout type de véhicule : marque, date d’achat, prix d’achat :

Class Vehicule {


protected $marque;
protected $date_achat;
protected $prix_achat;
public function __construct($marque,$date_achat,$prix_achat) {
$this->marque = $marque;
$this->date_achat = $date_achat;
$this->prix_achat = $prix_achat;
}

}

On peut ensuite créer la classe avion et la classe voiture héritant de la classe véhicule :

Class Voiture Extends Vehicule {

private $cylindree;
private $km;
public function __construct($array) {
parent::__construct($array["marque"],$array["date_achat"],$array["prix_achat"]);
$this->cylindree = $array["cylindree"];
$this->km = $array["km"];
}
}

Class Avion Extends Vehicule {

private $type;
private $heures_vol;
public function __construct($array) {
parent::__construct($array["marque"],$array["date_achat"],$array["prix_achat"]);
$this->type = $array["type"];
$this->heures_vol = $array["heures_vol"];
}

}

Structurer vos classes de cette manière permet de rendre votre programmation orientée objet plus abstraite, et donc plus flexible. Changer un type d’objet particulier après production sera plus aisé et plus stable.

Objets sans design polymorphique

Créer une classe de génération de champs de formulaire sans polymorphisme :

<?php
class Form {
public function genInput($type,$name,$value) {
SWITCH($type) {
Case”text”:
print “<input type=\”text\” name=\”".$name.”\” value=\”".$value.”\” />\r\n”;
break;
Case”textarea”:
print “<textarea name=\”".$name.”\”>”.$value.”</textarea>\r\n”;
break;
}
}
}
$form = new Form(); //initialisation de l’objet formulaire
$form->genInput(“text”,”field1″,”Lorem ipsum…”); //affiche <input type=”text” name=”field1″ value=”Lorem ipsum…” />
$form->genInput(“textarea”,”field2″,”Lorem ipsum…”); //affiche <textarea name=”field2″>Lorem ipsum…</textarea>
?>

Objets avec design polymorphique

Pour qu’un objet puisse revêtir plusieurs formes, qu’il s’agisse d’un champ texte ou d’un champ textarea, nous devons rendre notre classe plus abstraite.
Nous allons donc créer une interface, une classe abstraite et quelques sous-classes (selon le type de champ).
L’interface définira les fonctions que l’objet appellera sans définir ce que ces fonctions feront. L’interface ne définira aucune des fonctionnalités de ces méthodes, elle se contente de les nommer. Chaque sous-classe devra comporter la définition de la méthode genInput().

//INTERFACE
interface Form {

public function genInput();

}

Une classe abstraite est une classe qui nous n’implémentons que partiellement. Elle contient les méthodes (fonctions) abstraites qui offrent des fonctionnalités communes. Le reste des autres fonctioannlités sera défini dans les sous-classes.
//ABSTRACT CLASS
abstract class Input {
protected $name;
protected $value;
public function __construct($name,$value) {
$this->name = $name;
$this->value = $value;
}
}
Puis les classes dérivées appelleront la méthode définie dans la classe abstraite (parent::__construct()) et la méthode nommée dans l’interface (genInput()) :
//TEXT & PASSWORD & HIDDEN INPUT
class Text extends Input implements Form {
private $type;
private $size;
public function __construct($array) {
parent::__construct($array["name"],$array["value"]);
$this->type = $array["type"];
$this->size = $array["size"];
}
public function genInput() {
return “<input type=\”".$this->type.”\” name=\”".$this->name.”\” value=\”".$this->value.”\” size=\”".$this->size.”\” />\r\n”;
}
}
//TEXTAREA INPUT
class Textarea extends Input implements Form {
private $cols;
private $rows;
public function __construct($array) {
parent::__construct($array["name"],$array["value"]);
$this->cols = $array["cols"];
$this->rows = $array["rows"];
}
public function genInput() {
return “<textarea name=\”".$this->name.”\” cols=\”".$this->cols.”\” rows=\”".$this->rows.”\”>”.$this->value.”</textarea>\r\n”;
}
}
Voici comment créer un champ texte :
$object = new Text(array(“type”=>”text”,”name”=>”form_id”,”value”=>$item,”size”=>20));
$hidden = $object->genInput();
Générer un champ textarea ressemble à ceci :
$object = new Textarea(array(“name”=>”form_txta”,”value”=>$item ,”cols”=>20 ,”rows”=>5));
$textarea = $object->genInput();
Webliography :

Abstract classes and interfaces
Devshed polymorphism in PHP5 article
PHP5 Tutorial : Abstract classes and Interfaces
PHP5 OOP abstract classes & interfaces

Polymorphism in PHP5

Polymorphism is one of the major Object Oriented Programming features (OOP) mature programming languages like C++ or JAVA implement. Though OOP experts may reasonably claim that PHP is not strictly Object Oriented (since nothing is an object in PHP unless you create it), the language has become polymorphism-ready with version PHP5.

What is polymorphism?

Its principle lies in its name : [poly-] means much, many and [-morphism] means forms, states. So, programming in a polymorphic way allows the developer to have one single object behaving differently according to its type. Practically speaking, the developer writes a base class which defines the basic features of the object and as many subclasses as necessary to build the different behaviours the object may have. Calling the same method will have the object’s children behave differently.

Here is a simple example of polymorphic design with a vehicle object. The Vehicle class has as attributes pieces of information that are found in every kind of vehicle : make, registering date, price :

Class Vehicle {


protected $make;
protected $date;
protected $price;
public function __construct($make,$date,$price) {
$this->make = $make;
$this->date= $date;
$this->price= $price;
}

}

Then create the plane class and the car class that will inherit the vehicle class :

Class Car Extends Vehicle {

private $engine;
private $mileage;
public function __construct($array) {
parent::__construct($array["make"],$array["date"],$array["price"]);
$this->engine = $array["engine"];
$this->mileage = $array["mileage"];
}
}

Class Plane Extends Vehicule {

private $type;
private $seats;
public function __construct($array) {
parent::__construct($array["make"],$array["date"],$array["price"]);
$this->type = $array["type"];
$this->seats = $array["seats"];
}

}

Structuring your classes that way allows you to make your OOP more abstract, thus more flexible. Changing a specific type of object after production time will be made easier and more stable.

Objects without polymorphic design

Imagine you want to create a form generator class without polymorphism :

<?php
class Form {
public function genInput($type,$name,$value) {
SWITCH($type) {
Case”text”:
print “<input type=\”text\” name=\”".$name.”\” value=\”".$value.”\” />\r\n”;
break;
Case”textarea”:
print “<textarea name=\”".$name.”\”>”.$value.”</textarea>\r\n”;
break;
}
}
}
$form = new Form(); //initialize form object
$form->genInput(“text”,”field1″,”Lorem ipsum…”); //prints <input type=”text” name=”field1″ value=”Lorem ipsum…” />
$form->genInput(“textarea”,”field2″,”Lorem ipsum…”); //prints <textarea name=”field2″>Lorem ipsum…</textarea>
?>

Objects with polymorphic design

In order to allow an object to have several forms, be it a text field or a textarea field, we need to make our class more abstract.
So, we will create an interface, an abstract class and several subclasses (depending on the type of field).
The interface will define the functions the object will perform, no matter what the function will do. But the interface will not define any functionality of the methods, it only names them. The precise functionalities of the genInput() function will be defined in every subclass.

//INTERFACE
interface Form {

public function genInput();

}

The abstract class is a class that we only partially implement. It contains abstract methods (functions) that provide some common functionalities. The rest of the necessary functionalities will be defined in the subclasses.
//ABSTRACT CLASS
abstract class Input {
protected $name;
protected $value;
public function __construct($name,$value) {
$this->name = $name;
$this->value = $value;
}
}
Then the derived classes will call the method set in the abstract class (parent::__construct()) and the method named in the interface (genInput()) :
//TEXT & PASSWORD & HIDDEN INPUT
class Text extends Input implements Form {
private $type;
private $size;
public function __construct($array) {
parent::__construct($array["name"],$array["value"]);
$this->type = $array["type"];
$this->size = $array["size"];
}
public function genInput() {
return “<input type=\”".$this->type.”\” name=\”".$this->name.”\” value=\”".$this->value.”\” size=\”".$this->size.”\” />\r\n”;
}
}
//TEXTAREA INPUT
class Textarea extends Input implements Form {
private $cols;
private $rows;
public function __construct($array) {
parent::__construct($array["name"],$array["value"]);
$this->cols = $array["cols"];
$this->rows = $array["rows"];
}
public function genInput() {
return “<textarea name=\”".$this->name.”\” cols=\”".$this->cols.”\” rows=\”".$this->rows.”\”>”.$this->value.”</textarea>\r\n”;
}
}
This is how you can create a text field :
$object = new Text(array(“type”=>”text”,”name”=>”form_id”,”value”=>$item,”size”=>20));
$hidden = $object->genInput();
Generating a textarea field looks like this :
$object = new Textarea(array(“name”=>”form_txta”,”value”=>$item ,”cols”=>20 ,”rows”=>5));
$textarea = $object->genInput();
Webliography :

Abstract classes and interfaces
Devshed polymorphism in PHP5 article
PHP5 Tutorial : Abstract classes and Interfaces
PHP5 OOP abstract classes & interfaces