Configurer Aptana pour connecter des bases de données MySql

Utiliser Aptana comme IDE PHP est super mais devoir systématiquement changer de fenêtre de travail pour afficher PhpMyadmin et vérifier la structure des tables Mysql devient vite lassant (même si [CMD + TAB] ou [CTRL + TAB] rendent la chose un peu plus aisée). Dans ce cadre, il pourrait être utile de configurer une connection MySql sous Aptana.

Cet article présente la configuration sous Mac OSx 10.6 avec MAMP. Mais vous pourriez aisément configurer Aptana de la même manière avec une solution LAMP (sous Linux) ou WAMP (sous Windows).

Pour cette configuration, vous aurez besoin du MySql Connector/J driver que vous trouverez sur http://www.mysql.com/downloads/connector/j/. Téléchargez-le et décompressez-le dans le répertoire /Mamp/Library/share/Mysql/Connectors/.

1. Installer le plugin Sql Explorer pour Aptana

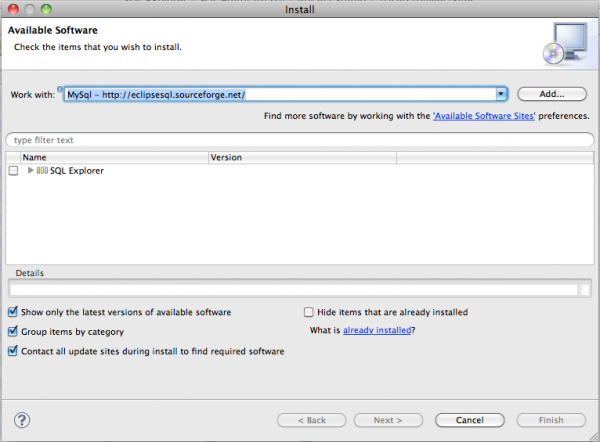
Tout d’abord, vous devrez installer le plugin Sql Explorer plugin pour Aptana : Sélectionnez le Menu Help / Install Software, puis cliquez sur le bouton “Add” pour ajouter un site source pour l’installation du plugin. Donnez-lui un nom (MySql) et l’emplacement suivant : http://eclipsesql.sourceforge.net/

Puis sélectionnez le site source nouvellement créé de la liste déroulante et cochez “SQL Explorer” avant de cliquer sur le bouton “finish” :

Add download site for Sql Explorer

2. Créer une connexion MySql

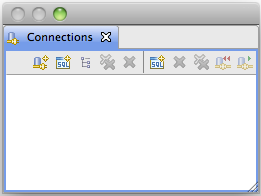
Ouvrez Aptana et sélectionnez le Menu Window / Open perspective / Other / SQL Explorer. Puis sélectionnez le menu Window / Showview / Connections pour créer une nouvelle connexion à MySql :

Window - Showview - Connections (create a MySql connection)

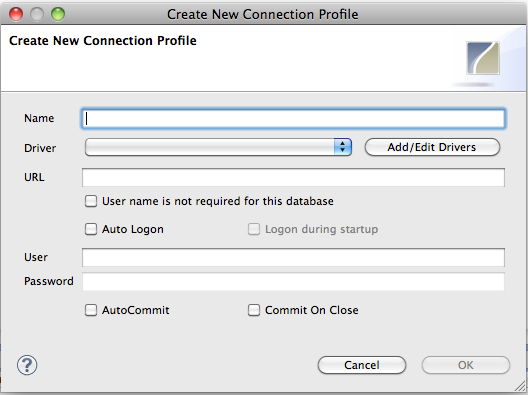
Cliquez sur le bouton “Create new connection profile” pour configurer le driver MySql : Create new database connection profile et afficher :

Configure Mysql connection

Donnez un nom à votre connexion : Mysql

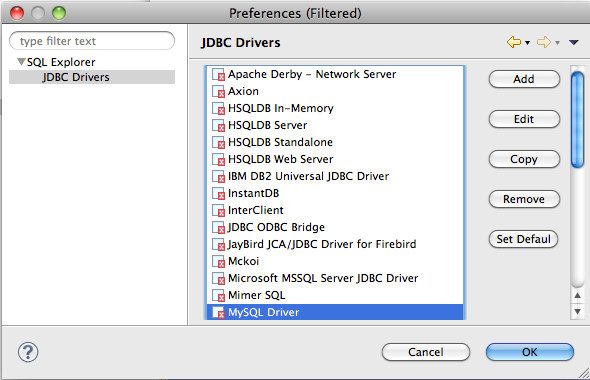
Puis cliquez sur “Add/Edit drivers”, et affichez le contenu de “SQL Explorer” dans le menu de gauche et cliquez sur “JDBC Drivers” puis sélectionnez “MySql Driver”:

Edit MySql driver

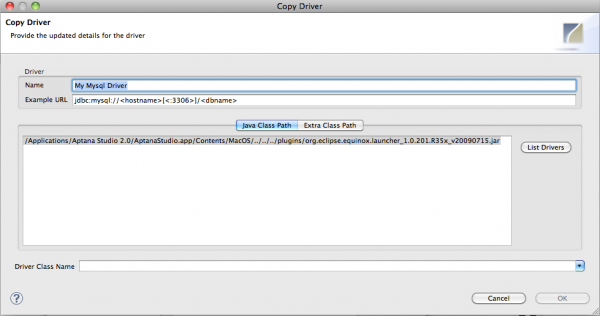
Choisissez le bouton “Copy” pour éditer les préférences d’une copie du MySql Driver et donnez un nom à votre driver (My MySql driver) :

Editing Mysql driver

Editez l’example URL comme suit :

jdbc:mysql://localhost:3306/

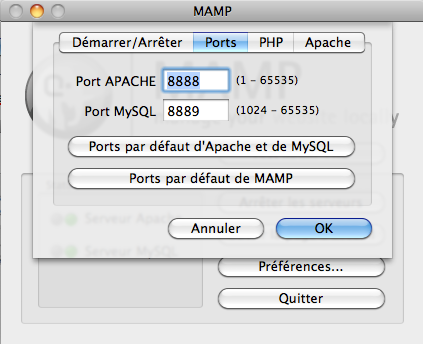
Vous devrez aussi changer le port puisque le port 3306 est le port de connexion MySql par défaut. Ouvrez MAMP et cliquez sur Preferences / Ports :

Checking MAMP MySql connection port

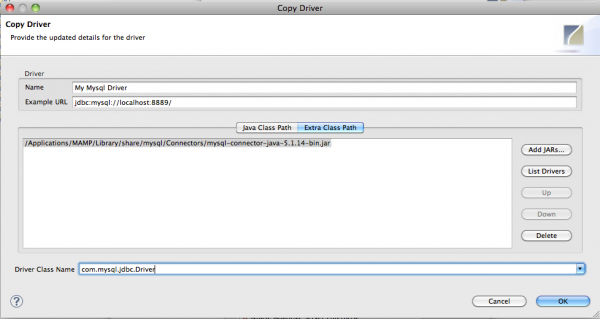
puis changez l’example URL du driver MySql :

jdbc:mysql://localhost:8889/

Cliquez ensuite sur le bouton “Extra class path” pour ajouter le MySql Connector/J driver (fichier mysql-connector-java-5.1.14-bin.jar) que vous trouverez dans /Mamp/Library/share/Mysql/Connectors/.

et complétez le Driver class name comme suit :

com.mysql.jdbc.Driver

Votre bopite de dialogue de Préférences driver devrait ressembler à ceci :

Mysql driver preferences

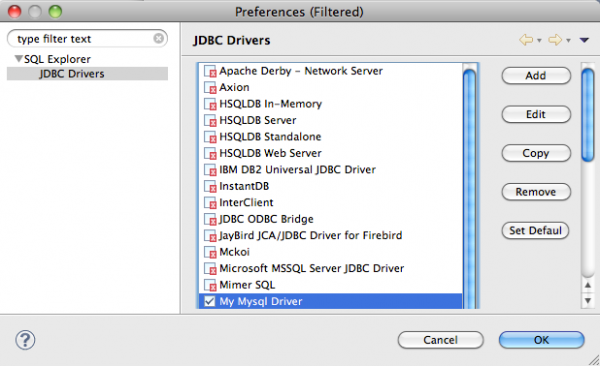
Cliquez “OK”. Aptana montre que votre driver a été correctement configuré :

Mysql driver correctly configured

Cliquez “OK” pour sélectionner “My MySql Driver” pour la connexion courante :

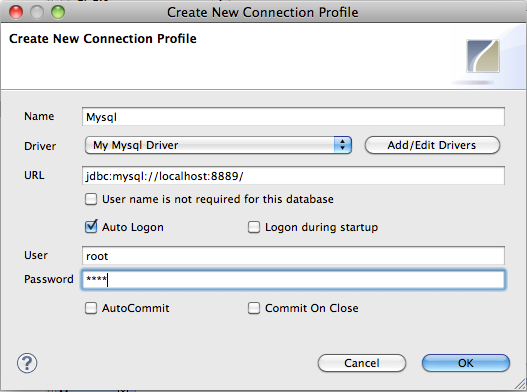
Dans la boîte de dialogue “Create new connection profile”, sélectionnez le driver MySql nouvellement créé (My Mysql Driver) dans la liste déroulante. Cochez “auto logon” et saisissez le username et password root MySql :

Set MySql username and password

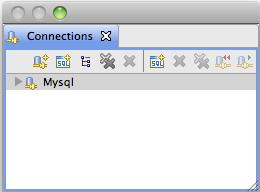
puis cliquez “OK”. Votre connexion est maintenant prête :

MySql connection ready

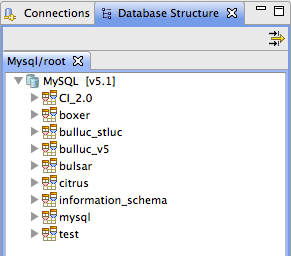
Opérez un clic droit sur votre connexion “Mysql” pour visualiser les structures de vos bases de données :

View Database structures

Configuring Aptana to connect MySql databases

Using Aptana is great but having to constantly switch to PhpMyadmin to check Mysql table structures can be tiring (even if [CMD + TAB] or [CTRL + TAB] makes it a bit easier). It may then be useful to configure a MySql connection in Aptana.

This post will tackle the configuration on Mac OSx 10.6 with MAMP installed. But you could easily configure Aptana the same way on LAMP (Linux) or WAMP (Windows) platforms.

Therefore, you’ll need the MySql Connector/J driver that can be found on http://www.mysql.com/downloads/connector/j/. Download and unzip it in the /Mamp/Library/share/Mysql/Connectors/ folder.

1. Install Sql Explorer plugin in Aptana

First, you’ll need to install the Sql Explorer plugin for Aptana : Select Menu Help / Install Software, then click “Add” to add a site for the plugin install. Give it a name (MySql) and the following location : http://eclipsesql.sourceforge.net/

Then select your newly created source site from the combo box and tick “SQL Explorer” before clicking the “finish” button :

Add download site for Sql Explorer

2. Create a MySql connection

Open Aptana and select Menu Window / Open perspective / Other / SQL Explorer. Then select Menu Window / Showview / Connections to create a new connection to Mysql :

Window - Showview - Connections (create a MySql connection)

Click on the “Create new connection profile” button to configure the MySql driver : Create new database connection profile to display :

Configure Mysql connection

Give a name to your connection : Mysql

Then click on “Add/Edit drivers”, then expand the “SQL Explorer” from the left menu and click on “JDBC Drivers” and select “MySql Driver”:

Edit MySql driver

Then click the “Copy” button to edit preferences on a copy of the item and give your driver a new name (My MySql driver) :

Editing Mysql driver

Edit the example URL as follows :

jdbc:mysql://localhost:3306/

You still need to change the port since port 3306 is the default MySql connection port. Open MAMP and click Preferences / Ports :

Checking MAMP MySql connection port

then change the MySql driver example URL :

jdbc:mysql://localhost:8889/

Then click the “Extra class path” button to add the MySql Connector/J driver (file mysql-connector-java-5.1.14-bin.jar) that is to be found in /Mamp/Library/share/Mysql/Connectors/.

and fill in the Driver class name as follows :

com.mysql.jdbc.Driver

Your driver preferences dialog should look like this :

Mysql driver preferences

Then click “OK”. Aptana now shows your driver as being correctly configured :

Mysql driver correctly configured

Click “OK” to select “My MySql Driver” for the present connection.

In the “Create new connection profile” dialog, select the newly created Mysql driver (My Mysql Driver) from the combo box. Tick “auto logon” and type the MySql root username and password :

Set MySql username and password

and click “OK”. Your Connection is now ready :

MySql connection ready

Right click your “Mysql” connection to view database structures :

View Database structures

Un formulaire sous Codeigniter avec Ajax

codeigniterCodeIgniter (CI), le framework PHP, est passé à la version 2.0. Cette version a été réécrite pour fonctionner en PHP5 exclusivement : les helpers des versions antérieures étaient en PHP4. Une belle amélioration attendue en soi. Ce framework est léger et aide les développeurs à travailler plus vite. Cet article traitera de :

  • la configuration du framework
  • la création d’un formulaire de login avec requête Ajax.

1. installation de CI

Téléchargez la version 2.0 à partir du site http://codeigniter.com/. Décompressez l’archive et placez les fichiers dans un sous-répertoire de votre /www/. Quand vous chargez la page http://localhost:8888/codeigniter/, vous verrez la page suivante (j’ai installé CI sur ma machine locale et le port MAMP (solution Mac Apache-Mysql-PHP) par défaut est 8888. Si vous travaillez sous windows avec une solution WAMP http://localhost/codeigniter/ suffira :

Ouvrir Codeigniter dans votre navigateur

La page affichée est /application/views/welcome_message.php qui est chargée via /application/controllers/welcome.php. Ce contrôleur contient la classe Welcome qui est définie comme le contrôlleur par défaut dans /application/config/routes.php. Si vous voulez appeler ce contrôleur dans l’url, vous devrez utiliser http://localhost:8888/codeigniter/index.php/welcome. Dans cette url, index.php est le contrôleur principal de CI que vous trouverez dans le répertoire root /codeigniter/. Ce fichier devra rester mais vous pouvez l’enlever de l’url : pour cela :

  • ouvrez /config/config.php et changez le index_page : $config['index_page'] = “”;
  • puis ajoutez un fichier .htaccess file à la racine de votre projet /codeigniter/ :

SetEnv MAGIC_QUOTES 0
SetEnv PHP_VER 5
Options +FollowSymlinks -MultiViews
RewriteEngine On
DirectoryIndex index.php
RewriteCond %{REQUEST_URI} ^system.*
RewriteRule (.*) index.php?/$1 [L]
RewriteCond %{REQUEST_FILENAME} !-f
RewriteCond %{REQUEST_FILENAME} !-d
RewriteCond $1 !^(index\.php|images|robots\.txt|css)
RewriteRule (.*) index.php?/$1 [L]

Ainsi, vous activerez le Mod_rewrite d’Apache et serez capable de charger http://localhost:8888/codeigniter/index.php/welcome via http://localhost:8888/codeigniter/welcome.

Ouvrons maintenant quelques fichiers de configuration CodeIgniter pour configurer la connexion à la base de données et quelques autres points.

1.1. La structure des fichiers Codeigniter : un framework MVC

En jetant un oeil au répertoire /www/codeigniter/ vous constaterez la structure suivante :

Structure MVC des fichiers Codeiginiter

Comme vous les voyez, CI est un framework MVC :

  • le répertoire /application/ contient les fichiers de votre projet :
  • le répertoire /application/controllers/ contient les fichiers des contrôleurs (pour recevoir des informations et effectuer des requêtes aux modèles)
  • le répertoire /application/models/ contient les fichiers de requêtes à la base de données
  • le répertoire /application/views/ contient les vues (fichiers Html, formulaires,…)

Un autre répertoire important est /system/ : il contient tous les fichiers CI (librairies, helpers,…)

Les fichiers de configuration de CI se trouvent dans /application/config/. Ouvrez /config/config.php et changez les lignes suivantes :

  • site url : $config['base_url'] = “http://localhost:8888/codeigniter/”;
  • index file : $config['index_page'] = “”;

Puis ouvrez /application/config/database.php pour configurer les informations de connexion à la base de données :

  • $db['default']['hostname'] = ‘localhost’;
  • $db['default']['username'] = ‘root’;
  • $db['default']['password'] = ‘root’;
  • $db['default']['database'] = ‘codeigniter’;

et adaptez les valeurs à votre propre configuration.

Nous pouvons aussi charger des librairies ou helpers CI de manière automatisée. Vous ne devrez donc pas les ouvrir dans chaque contrôleur. Ouvrez /config/autoload.php et modifiez les lignes suivantes :

  • $autoload['libraries'] = array(‘database’); //pour charger la librairie CI de connexion à la base de données de manière automatique
  • $autoload['helper'] = array(‘url’,'form’); //pour charger les helpers url et formulaire

1.2. Configurer la base de données

Ouvrez votre navigateur et chargez PhpMyAdmin : http://localhost:8888/phpmyadmin/ puis exécutez les requêtes suivantes :
CREATE DATABASE codeigniter;
CREATE TABLE users ( user_ID int unsigned not null auto_increment primary key, username varchar(20), password varchar(32) );

2. Création du formulaire de login

Le formulaire Html que nous allons créer est simple. Codeigniter possède des librairies et helpers que vous trouverez dans le réperoire /system/. Nous avons précédemment chargé le helper “form” de manière automatique (en modifiant le fichier /application/config/autoload.php) pour nous aider à construire notre formulaire.

Créez le fichier /application/views/v_login.php (j’utilise le préfixe ‘v_’ pour différencier plus aisément les vues (‘v_’) des modèles (‘m_’) et contrôleurs (‘c_’)) :
<!DOCTYPE html>
<html lang="fr">
<head>
<title>Login</title>
<meta name="robots" content="index,follow" />
<meta name="description" content="Login" />
<meta http-equiv="Content-type" content="text/html; charset=iso8859-1" />
<script src="http://ajax.googleapis.com/ajax/libs/jquery/1.4/jquery.min.js"></script>
<style type="text/css">
p { margin: 0; padding: 0; }
input.textbox { width: 120px;color: #777;height: 18px;padding: 2px;border: 1px solid #E5E5E5;vertical-align: top; }
input.button { width: auto;height: 22px;padding: 2px 5px;vertical-align: top; }
</style>
</head>
<body>
<?php
echo form_open('login');
?>
<div id="message">
</div>
<p>
<label for'username'>username</label>
<?=form_input(array('name'=>'email','value'=>'','class'=>'username textbox','style'=>'width:150px;'))?><br />
</p>
<p>
<label for'password'>password</label>
<?=form_password(array('name'=>'password','value'=>'','class'=>'password textbox'))?><br />
</p>
<p>
<?='<br />'.form_submit('submit','Login','id="submit"')?>
</p>
<?=form_close("\n")?>
</body>
</html>

Vous constatez que nous faisons ici appel à des fonctions du helper “form” : ‘form_open()’, ‘form_close()’ qui génèrent les <form> et </form>.

La balise <head> de cette vue contient aussi le lien vers le fichier Jquery.js dont nous aurons besoin pour faire fonctionner notre script Ajax : <script src="http://ajax.googleapis.com/ajax/libs/jquery/1.4/jquery.min.js"></script>

La div “message” sera utilisée pour afficher la réponse du script Ajax.

Le formulaire Html est prêt mais il nous faut maintenant créer le contrôleur qui chargera cette vue.

3. Création du contrôleur de login

Créez le fichier /application/controllers/c_login.php.
<?php if ( ! defined('BASEPATH')) exit('No direct script access allowed');
class C_login extends CI_Controller {
function __construct() {
parent::__construct();
$this->load->library('form_validation');
}
function index() {
$this->load->view('v_login');
}
}
/* End of file c_login.php */
/* Location: ./application/controllers/c_login.php */

Le constructeur de ce contrôleur charge la librairie form_validation que nous utiliserons pour vérifier le contenu des champs du formulaire postés.

Pour charger ce contrôleur dans un navigateur, appelez la page http://localhost:8888/codeigniter/c_login

La méthode de ce contrôleur qui sera appelée par défaut est la méthode index() qui charge la vue du formulaire (v_login.php)

Pour que le contrôleur c_login devienne le contrôleur par défaut, et puisse être appelé http://localhost:8888/codeigniter/, vous devrez changer /application/config/routes.php et saisir c_login comme contrôleur par défaut :

$route['default_controller'] = “c_login”;

Si vous désirez que ce contrôleur soit accessible via http://localhost:8888/codeigniter/login, éditez /application/config/routes.php et ajoutez :

$route['login'] = ‘c_login’;

4. Création de la requête Ajax

Retournons maintenant au fichier /views/v_login.php.

Nous allons rédiger un script javascript qui :

  • s’exécutera lorsque l’utilisateur cliquera sur le bouton submit
  • n’enverra pas les données du formulaire au contrôleur via une requête http mais via une requête ajax
  • récupérera les contenus des champs du formulaire en javascript
  • passera ces valeurs au contrôleur via une requête Ajax

Ajoutez le code suivant juste avant la balise de fermeture </head> :

<script type="application/javascript">
$(document).ready(function() {
$('#submit').click(function() {
var form_data = {
username : $('.username').val(),
password : $('.password').val(),
ajax : '1'
};
$.ajax({
url: "<?php echo site_url('login/ajax_check'); ?>",
type: 'POST',
async : false,
data: form_data,
success: function(msg) {
$('#message').html(msg);
}
});
return false;
});
});
</script>

Jquery nous permet d’exécuter une fonction dès que le document DOM a été chargé : $(document).ready

Le script sera activé dès que l’utilisateur clique sur le bouton submit : $(‘#submit’).click : le signe # identifie l’attribut “id” d’un élément de la page (le bouton submit dans ce cas).

Puis nous stockons les variables du formulaire (username et password que nous récupérons grâce à la classe de style $(‘.username’)) dans l’array form_data. Cet array contient également la clé “ajax” avec “1″ comme valeur. Cette valeur sera testée dans le contrôleur.

Puis vient la requête $.ajax qui contient le tableau suivant :

  • url : l’url vers laquelle la requête sera envoyée
  • type : les variables seront postées au contrôleur
  • data : l’array des variables à passer au contrôleur
  • success : ce que le script doit faire si la requête est réussie : le contrôleur renverra un commentaire qui sera affiché dans la div $(‘#message’).

return : false; est utilisé pour empêcher l’envoi du formulaire par http quand l’utilisateur clique sur le bouton submit.

Dans cet exemple, l’url “login/ajax_check” ne sera accessible que dans le cas où vous ajoutez le code suivant dans /config/routes.php :

$route['login/ajax_check'] = 'c_login/ajax_check';

5. La fonction ajax_check du contrôleur : création de la méthode de traitement des données reçues via Ajax

Nous créons ensuite une seconde méthode du contrôleur c_login : ajax_check() pour vérifier les données postées via Ajax.

function ajax_check() {
if($this->input->post('ajax') == '1') {
$this->form_validation->set_rules('username', 'username', 'trim|required|xss_clean');
$this->form_validation->set_rules('password', 'password', 'trim|required|xss_clean');
$this->form_validation->set_message('required', 'Please fill in the fields');
if($this->form_validation->run() == FALSE) {
echo validation_errors();
} else {
echo 'login successful';
}
}
}

Le script vérifie d’abord si la variable “ajax” est égale à ’1′. Si c’est le cas, nous utilisons la librairie CI de validation des formulaires pour vérifier les champs requis et afficher les erreurs de validation éventuelles.

6. Exécuter le script

Ouvrez Fifrefox et installez l’addon Firebug s’il n’est pas encore installé : https://addons.mozilla.org/fr/firefox/addon/firebug/

Cet addon vous permettra de vérifier pas à pas la progression de votre requête ajax. Lancez Firebug via Menu Outils / Firebug. Puis activez la console :

Firebug - console

Ouvrez la page de login : http://localhost:8888/codeigniter/login et cliquez sur le bouton “submit”. Vous verrez la réponse Ajax suivante :

Ajax response

7. Vérifier l’utilisateur dans la base de données : utilisation des modèles

Nous allons changer la méthode ajax_check du contrôleur c_login pour charger un modèle et vérifier si l’utilisateur existe dans la base de données :
function ajax_check() {
if($this->input->post('ajax') == '1') {
$this->form_validation->set_rules('username', 'username', 'trim|required|xss_clean');
$this->form_validation->set_rules('password', 'password', 'trim|required|xss_clean');
$this->form_validation->set_message('required', 'Please fill in the fields');
if($this->form_validation->run() == FALSE) {
echo validation_errors();
} else {
$this->load->model('m_access');
$user = $this->m_access->check_user($this->input->post('username'),$this->input->post('password'));
if($user == '1') {
echo 'login successful';
} else {
echo 'unknown user';
}
}
}
}

Ce script charge le modèle m_access, puis nous appelons la méthode check_user et lui envoyons les variables username et password.

Voici le modèle /application/models/m_access.php :
<?
class M_access extends CI_Model {
public function check_user($username,$password) {
$this->query = $this->db->select('COUNT(*)')->from('users')->where(array('username'=>$username,'password'=>$password))->limit(1)->get();
return $this->query->row_array();
}
}

Vous pouvez télécharger les fichiers : codeigniter

Codeigniter form with Ajax

codeigniterCodeIgniter (CI), the PHP framework, has evolved towards version 2.0. The main version feature is scripts are being rewritten in PHP5 (helpers in former verisons were still in PHP4). This framework is lightweight and helps developers work faster. This post will tackle :

  • the framework configuration
  • the building of a login form with an Ajax request

1. CI installation

First download CodeIgniter 2.0 source from http://codeigniter.com/ (follow the link ‘Get Source’). Unzip that file and place it in your local /www/ directory. Loading the page http://localhost:8888/codeigniter/ will display the following page (I’ve installed it on my local machine and the default port for MAMP (Mac Apache-Mysql-PHP solution) is 8888. If you’re working under windows with a WAMP solution, http://localhost/codeigniter/ will do the trick) :
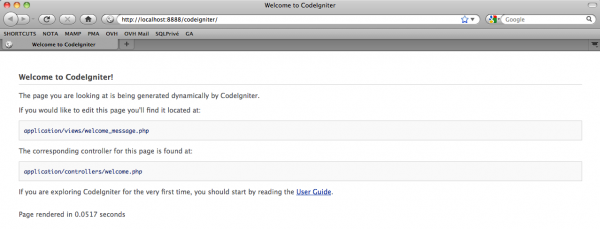
Open CodeIgniter in your browser

The page which is displayed is /application/views/welcome_message.php which is loaded via /application/controllers/welcome.php. This controller contains the class Welcome which is defined as the default controller in /application/config/routes.php. If you want to reach that controller in the URL, you’ll have to use http://localhost:8888/codeigniter/index.php/welcome. In that URL, index.php is the CI front controller which is to be found in the root directory /codeigniter/. You will have to keep that index.php file but you can take it away from the URL :

  • open /config/config.php and change the index_page to $config['index_page'] = “”;
  • then add a .htaccess file to the root of your project /codeigniter/ :

SetEnv MAGIC_QUOTES 0
SetEnv PHP_VER 5
Options +FollowSymlinks -MultiViews
RewriteEngine On
DirectoryIndex index.php
RewriteCond %{REQUEST_URI} ^system.*
RewriteRule (.*) index.php?/$1 [L]
RewriteCond %{REQUEST_FILENAME} !-f
RewriteCond %{REQUEST_FILENAME} !-d
RewriteCond $1 !^(index\.php|images|robots\.txt|css)
RewriteRule (.*) index.php?/$1 [L]

In doing so, you’ll activate Apache Mod_rewrite and be able to load http://localhost:8888/codeigniter/index.php/welcome via http://localhost:8888/codeigniter/welcome.

Now, we’ll open some CodeIgniter configuration files to setup database connection and other stuff :

1.1. Codeigniter file structure : the MVC framework

If you take a look at the /www/codeigniter/ directory, you’ll see the following structure :
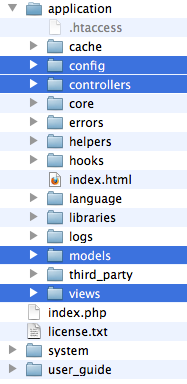
Codeigniter file structure

As you can see, Codeigniter is an MVC framework. The /application/ directory is the directory of your project files :

  • the /controllers/ directory contains controller files (receive input and make requests to the models)
  • the /models/ directory contains model files (requests to the database)
  • the /views/ directory contains view files (Html, formulaires,…)

Another important directory is /system/ : it contains all the Codeigniter core files (libraries, helpers,…)

Codeigniter config files are stored in the /config/ directory. Let’s open /config/config.php and change the following lines :

  • Base site url : $config['base_url'] = “http://localhost:8888/codeigniter/”;
  • Index file : $config['index_page'] = “”;

Then open /config/database.php to set up the database connection information :

  • $db['default']['hostname'] = ‘localhost’;
  • $db['default']['username'] = ‘root’;
  • $db['default']['password'] = ‘root’;
  • $db['default']['database'] = ‘codeigniter’;

and change the values to suit your own configuration.

We also need to autoload CI core libraries and helpers that will automatically load at each request and make our work much easier. Open /config/autoload.php and change the following lines :

  • $autoload['libraries'] = array(‘database’); //to automatically load CI’s database library (class for database connection)
  • $autoload['helper'] = array(‘url’,'form’); //to automatically load CI’s url and form helpers (classes for url handling and form building)

1.2. Setting up the database

Now, turn to your browser and load PhpMyAdmin : http://localhost:8888/phpmyadmin/ and execute the following queries :
CREATE DATABASE codeigniter;
CREATE TABLE users ( user_ID int unsigned not null auto_increment primary key, username varchar(20), password varchar(32) );

2. Creating the login form

The Html form we will create is rather easy. Codeigniter is made of core libraries and helpers that you’ll find in the /system/ directory. We’ve autoloaded the form helper to help us build our form.

So, create the file in /application/views/v_login.php (I use the ‘v_’ prefix to make the difference between views (‘v_’), models (‘m_’) and controller (‘c_’) files) :
<!DOCTYPE html>
<html lang="fr">
<head>
<title>Login</title>
<meta name="robots" content="index,follow" />
<meta name="description" content="Login" />
<meta http-equiv="Content-type" content="text/html; charset=iso8859-1" />
<script src="http://ajax.googleapis.com/ajax/libs/jquery/1.4/jquery.min.js"></script>
<style type="text/css">
p { margin: 0; padding: 0; }
input.textbox { width: 120px;color: #777;height: 18px;padding: 2px;border: 1px solid #E5E5E5;vertical-align: top; }
input.button { width: auto;height: 22px;padding: 2px 5px;vertical-align: top; }
</style>
</head>
<body>
<?php
echo form_open('login');
?>
<div id="message">
</div>
<p>
<label for'username'>username</label>
<?=form_input(array('name'=>'email','value'=>'','class'=>'username textbox','style'=>'width:150px;'))?><br />
</p>
<p>
<label for'password'>password</label>
<?=form_password(array('name'=>'password','value'=>'','class'=>'password textbox'))?><br />
</p>
<p>
<?='<br />'.form_submit('submit','Login','id="submit"')?>
</p>
<?=form_close("\n")?>
</body>
</html>

As you can see, the form helper is here at work with methods like ‘form_open()’, ‘form_close()’ that will automatically generate <form> and </form> tags.

The <head> of this view already contains the link to the Jquery.js file we will need to have our Ajax script work properly : <script src="http://ajax.googleapis.com/ajax/libs/jquery/1.4/jquery.min.js"></script>

The “Message” div will be used to display the Ajax Response.

The Html form is now ready but we still need to build the controller class that will load that view.

3. Creating the login controller

Create the file /application/controllers/c_login.php.
<?php if ( ! defined('BASEPATH')) exit('No direct script access allowed');
class C_login extends CI_Controller {
function __construct() {
parent::__construct();
$this->load->library('form_validation');
}
function index() {
$this->load->view('v_login');
}
}
/* End of file c_login.php */
/* Location: ./application/controllers/c_login.php */

The constructor of this controller loads the form_validation library which we will use to check the content of the posted fields. We’ll also use the url helper to build the url of the form action attribute.

In order to load this controller in a browser, you’ll simply have to call http://localhost:8888/codeigniter/c_login

The default method that will be called is the index() method that simply loads the form view (v_login.php)

To make this controller your default controller and be able to reach it via http://localhost:8888/codeigniter/, you’ll have to change /application/config/routes.php and set the default controller to c_login:

$route['default_controller'] = “c_login”;

If you want that controller to be reached via http://localhost:8888/codeigniter/login, simply edit /application/config/routes.php and add :

$route['login'] = ‘c_login’;

4. Creating the Ajax request

Let’s go back to our /views/v_login.php.

We’ll write a short javascript that will :

  • bypass the form submit to the login controller via http
  • get the values of the necessary fields in javascript
  • pass these values to the controller via an Ajax request

Just add the following code just before the </head> tag :

<script type="application/javascript">
$(document).ready(function() {
$('#submit').click(function() {
var form_data = {
username : $('.username').val(),
password : $('.password').val(),
ajax : '1'
};
$.ajax({
url: "<?php echo site_url('login/ajax_check'); ?>",
type: 'POST',
async : false,
data: form_data,
success: function(msg) {
$('#message').html(msg);
}
});
return false;
});
});
</script>

Jquery allows us to execute a function once the DOM document has been loaded : $(document).ready

The script will be triggered once the submit button is hit : $(‘#submit’).click : the # sign identifies the “id” attribute of an element of the page (the submit button in this case).

Then we store the posted variables (username and password) in the form_data array. This array also contains the “ajax” key with value “1″. This value will be checked in the controller.

Then comes the $.ajax request which contains an array :

  • url : the url the request must be sent to
  • type : variables are posted to the controller
  • data : the array of variables passed to the controller
  • success : what the script must do if the request is successful : the controller will return a piece of text that will be displayed in the $(‘#message’) div.

return : false; is used to prevent the script from actually reaching the form action url through http when the submit button is clicked.

In this example, the url “login/ajax_check” will only be reachable if you add the following to the /config/routes.php :

$route['login/ajax_check'] = 'c_login/ajax_check';

5. Creating the ajax_check controller method

We will then create a second controller method called ajax_check() to check the variables posted through Ajax.

function ajax_check() {
if($this->input->post('ajax') == '1') {
$this->form_validation->set_rules('username', 'username', 'trim|required|xss_clean');
$this->form_validation->set_rules('password', 'password', 'trim|required|xss_clean');
$this->form_validation->set_message('required', 'Please fill in the fields');
if($this->form_validation->run() == FALSE) {
echo validation_errors();
} else {
echo 'login successful';
}
}
}

The script checks if the ajax variable posted equals to “1″. If so, we use the Codeigniter form_validation library to check the required fields and echo the validation errors if necessary.

6. Playing the script

Open Firefox and install Firebug addon if not yet installed : https://addons.mozilla.org/fr/firefox/addon/firebug/

This addon will let you check the different steps of the ajax request. Launch Firebug via Menu Tools / Firebug. Then activate the console to be able to check what’s happening in your page :

Firebug - console

Open the login page : http://localhost:8888/codeigniter/login and click “submit”. You’ll see the following Ajax response :
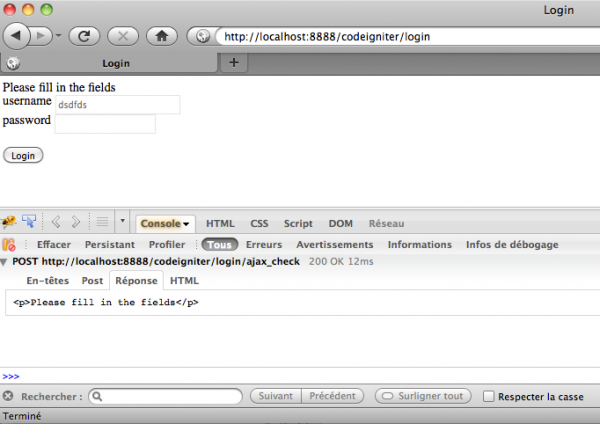
Ajax response

7. Checking the database : using models

We’ll change c_login controller method ajax_check and load a model to check if the user exists in the database :
function ajax_check() {
if($this->input->post('ajax') == '1') {
$this->form_validation->set_rules('username', 'username', 'trim|required|xss_clean');
$this->form_validation->set_rules('password', 'password', 'trim|required|xss_clean');
$this->form_validation->set_message('required', 'Please fill in the fields');
if($this->form_validation->run() == FALSE) {
echo validation_errors();
} else {
$this->load->model('m_access');
$user = $this->m_access->check_user($this->input->post('username'),$this->input->post('password'));
if($user == '1') {
echo 'login successful';
} else {
echo 'unknown user';
}
}
}
}

We’ve loaded a model called m_access, then we call the method check_user and send it the username and password variables.

You’ll then create the model itself in /application/models/m_access.php :
<?
class M_access extends CI_Model {
public function check_user($username,$password) {
$this->query = $this->db->select('COUNT(*)')->from('users')->where(array('username'=>$username,'password'=>$password))->limit(1)->get();
return $this->query->row_array();
}
}

You can download the necessary files : codeigniter