Zend Framework sous Mamp

Zend FrameworkAprès avoir passé beaucoup de temps en PHP orienté objet et choisi Codeigniter comme mon premier framework PHP, j’ai décidé de me mettre au Framework Zend qui est sans doute moins léger mais a une vocation plus universelle et est très bien documenté.

Téléchargement de (ZF) et installation locale sous MAC OSX MAMP

J’utilise MAMP sur Mac OSX. J’ai modifié le document root de MAMP (/Applications/MAMP/htdocs par défaut) en :

DocumentRoot “/Users/my_name/Sites”

dans le fichier /Applications/MAMP/conf/apache/httpd.conf

Ainsi, tous mes projets PHP se trouvent dans /Users/my_name/Sites/. C’est le répertoire où je vais installer ZF.

Tout d’abord, téléchargez ZF à partir de http://framework.zend.com/download/latest ou suivez le lien “Download Now” à partir de la page d’accueil Zend. J’ai choisi le Zend Framework 1.11.11 Full. Décompressez le fichier téléchargé dans votre serveur local : /Users/my_name/Sites/ZF/ dans mon cas.

Vous devez modifier votre fichier php.ini pour déclarer le chemin vers la library Zend, qui sera nécessaire pour faire fonctionner l’application que vous créerez. Ouvrez le fichier php.ini (/Applications/MAMP/conf/PHPX.X/php.ini ou parcourez le répertoire /Applications/MAMP/ pour le trouver (PHPX.X symbolise la version de PHP qu’utilise votre MAMP)) à l’aide de TextEdit.app et modifiez la valeur de l’include_path :

;include_path = “.:/Applications/MAMP/bin/php5.3/lib/php” Cette ligne a été commentée (par l’utilisation de “;” en début de ligne) et remplacée par la ligne suivante :
include_path = “.:/Applications/MAMP/bin/php5.3/lib/php:/Users/olivier/Sites/ZF/library”

N’oubliez pas de redémarrer MAMP après modification de votre include_path.

Créer un projet ZF via le Terminal

Ouvrez une fenêtre Terminal (/Applications/Utilitaires/Terminal). Utilisez ensuite la commande suivante pour vous placer dans le Document Root de MAMP :

cd /Users/my_name/Sites

Puis tapez la commande suivante :

/Users/my_name/Sites/ZF/bin/zf.sh create project my_zend

Le script shell ZF sera exécuté et générera le répertoire /Users/my_name/Sites/my_zend/ avec l’arborescence suivante :
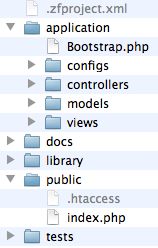
Zend project directory tree

Le répertoire application contient des fichiers structurés en MVC. Si vous avez déjjà approché un framework tel que Codeigniter, vous savez ce que cela signifie :

  • Models : contiendront les fichiers de requêtes à la base de données
  • Views : contiendront les fichiers d’Html et Css
  • Controllers : recevront les requêtes des clients, les traiteront, feront des appels aux modèles et enverront les données traitées aux vues.

Le seul répertoire qui doit être accessible aux internautes est le répertoire public.

Utiliser les VirtualHosts sous MAMP

L’usage des hôtes virtuels peut s’avérer très utile. En effet, dans la configuration de MAMP par défaut, vous appelez un de vos projets via une url du type :

http://localhost:8888/my_zend (8888 étant le port http par défaut dans MAMP).

Il est possible de raccourcir cette url et d’utiliser http://my_zend:8888. Personnellement, j’utilise un suffixe : http://my_zend.local:8888 comme hôte virtuel pour ne pas mélanger les domaines du web avec les domaines locaux.

Pour y parvenir, vous devrez modifier 2 fichiers : /private/etc/hosts et /Applications/MAMP/conf/apache/httpd.conf. Ces fichiers sont importants, je vous conseille donc d’en effectuer une sauvegarde via le Terminal en utilisant la commande suivante :

cp /private/etc/hosts /private/etc/hosts.bak

et

cp /Applications/MAMP/conf/apache/httpd.conf /Applications/MAMP/conf/apache/httpd.conf.bak

Dans le terminal, tapez :

sudo nano /private/etc/hosts

Vous devrez ensuite taper le mot de passe du Super Utilisateur Mac et pourrez modifier les hôtes. Utilisez les flèches du clavier pour atteindre la dernière ligne du fichier et tapez :

127.0.0.1 my_zend.local

Puis pressez [CTRL + o] pour enregistrer la modification.

Puis ouvrez le fichier /Applications/MAMP/conf/apache/httpd.conf à l’aide de TextEdit.app et ajoutez les lignes suivantes en fin de fichier :

NameVirtualHost my_zend.local
<VirtualHost my_zend.local>
DocumentRoot "/Users/my_name/Sites/my_zend/public"
ServerName my_zend.local
</VirtualHost>

Vous venez de créer un hôte virtuel. Redémarrez MAMP pour prendre ces modifications en compte et tapez http://my_zend.local:8888 dans votre navigateur favori :
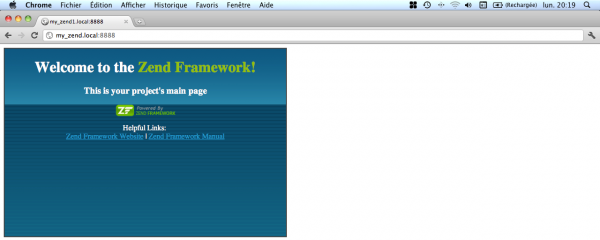
Zend Framework installation complete

Jetez un oeil au code source de cette page Html : les balises <html>, <head> et <body> sont absentes. Nous allons activer le layout dans ZF pour pouvoir définir ces balises pour toutes nos pages.

Activer layout dans ZF

Ouvrez une fenêtre Terminal et tapez le chemin de votre projet ZF :

cd /Users/my_name/Sites/my_zend/

Puis tapez la commande suivante pour activer le layout :

/Users/my_name/Sites/ZF/bin/zf.sh enable layout

Remarquez la structure du répertoire /application/layout qu’a généré le script shell ZF :
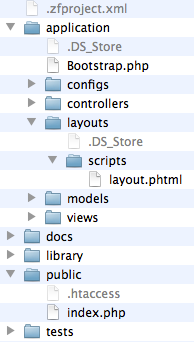
répertoire layout

Le fichier /application/configs/application.ini a aussi été modifié pour pointer le répertoire de layout

Pour avoir une déclaration XHTML Doctype correcte, nous devez initialiser l’objet view car déclarer le doctype appellera une vue. Modifiez le fichier /application/configs/application.ini et ajoutez la ligne suivante en bas de la section [production] :

resources.view[] = ""

Puis déclarez le doctype dans /application/Bootstrap.php :

class Bootstrap extends Zend_Application_Bootstrap_Bootstrap
{
protected function _initDoctype()
{
$this->bootstrap('view');
$view = $this->getResource('view');
$view->doctype('XHTML1_STRICT');
}
}

This being done, you can fill the file /application/layouts/scripts/layout.phtml with the following :

<!-- application/layouts/scripts/layout.phtml -->
<?php echo $this->doctype() ?>
<html xmlns="http://www.w3.org/1999/xhtml">
<head>
<meta http-equiv="Content-Type" content="text/html; charset=utf-8" />
<title>Zend Framework Quickstart Application</title>
<?php echo $this->headLink()->appendStylesheet('/css/global.css') ?>
<script src="https://ajax.googleapis.com/ajax/libs/jquery/1.6.4/jquery.min.js"></script>
</head>
<body>
<div id="header" style="background-color: #EEEEEE; height: 30px;">
<div id="header-logo" style="float: left">
<b>ZF Quickstart Application</b>
</div>
<div id="header-navigation" style="float: right">
<a href="<?php echo $this->url(
array('controller'=>'index'),
'default',
true) ?>">Index</a>
</div>
</div>
<?php echo $this->layout()->content ?>
</body>
</html>

Le code source des pages HTML générées contient désormais toutes les balises nécessaires.

Copier le répertoire Zend library

Les librairies ZF se trouvent dans le répertoire téléchargé /ZF/library/Zend/. Copiez le répertoire Zend et collez-le dans votre projet : /Users/my_name/Sites/library/ de sorte qu’il contienne le répertoire zend.

Webliography

Codeigniter Framework

Zend Framework

Zend Framework download

Zend Framework in action (Livre – English)

Zend Framework – Bien débuter en PHP (Livre en français)

Survive the deep end – Zend Book en ligne

Tutoriel Zend par Rob Allen (tuto 3 étoiles)

Zend Framework on MAMP

Zend FrameworkAfter spending much time in OOP PHP (Object Oriented PHP) and choosing Codeigniter as my first PHP framework, I decided to start working with Zend Framwork which is said to be less lightweight but seems to be a well-documented and universal reference.

Zend download (ZF) and local installation on MAMP MAc OSX 10.6.8

I’m using MAMP on Mac OSX 10.6.8. I’ve changed MAMP’s document root (in /Applications/MAMP/htdocs by default) to :

DocumentRoot "/Users/my_name/Sites"

in /Applications/MAMP/conf/apache/httpd.conf

So all my PHP projects are stored in /Users/my_name/Sites/. That’s the directory in which I’ll set up ZF.

First download ZF from http://framework.zend.com/download/latest or follow the “Download Now” link from the homepage. I chose the Zend Framework 1.11.11 Full package for download. Unzip it and copy the uncompressed ZF directory to your local web server : /Users/my_name/Sites/ZF/ in my case.

You’ll have to change your php.ini file to declare the path to ZF’s library, which will be required by the applications you’ll create. So open your php.ini file (/Applications/MAMP/conf/PHPX.X/php.ini or browse the /Applications/MAMP/ directory to find it (PHPX.X stands for your current PHP version)) and change your include_path :

;include_path = “.:/Applications/MAMP/bin/php5.3/lib/php” This line has been commented (use of “;” in front of the line) and replaced by the following:
include_path = “.:/Applications/MAMP/bin/php5.3/lib/php:/Users/olivier/Sites/ZF/library”

Don’t forget to restart MAMP once your include_path has been modified ;)

Create a ZF project : the Terminal magical way

Open a Terminal window found in Applications/Utilitaires/Terminal. Then use the following command to place yourself in MAMP’s Document Root :

cd /Users/my_name/Sites

Then type the following command :

/Users/my_name/Sites/ZF/bin/zf.sh create project my_zend

The ZF shell script will be executed and will generate the directory /Users/my_name/Sites/my_zend/ with the following directory tree :

Zend project directory tree

The application directory contains files structured in the MVC pattern. If you’re not new to frameworks like Codeigniter, you know what it means :

  • Models : will contain files with queries to the database
  • Views : will contain files with Html, Css
  • Controllers : will receive the client’s request, treat it, make calls to models and output data in views

The only directory that should be reachable from an internet client is the public directory. Therefore, we will create a Virtual Host.

Using VirtualHosts in MAMP

The use of virtual hosts can be very useful. Indeed, in the default configuration, reaching our new project can be done through the use of the following url :

http://localhost:8888/my_zend (8888 being the default http port in MAMP)

It is possible to reach the site through the url http://my_zend:8888. I personnally use http://my_zend.local:8888 as a virtualhost in order not to mix local websites with internet websites.

In order to achieve this, you’ll have to modify 2 files ; /private/etc/hosts and /Applications/MAMP/conf/apache/httpd.conf. Those files are important files for which you should save a copy thanks to the following command in Terminal :

cp /private/etc/hosts /private/etc/hosts.bak

and

cp /Applications/MAMP/conf/apache/httpd.conf /Applications/MAMP/conf/apache/httpd.conf.bak

In Terminal, type

sudo nano /private/etc/hosts

You’ll be prompted to type your Mac’s Super User password. and will be able to modify hosts. Use the keyboard arrows to get to the bottom line of the file and type

127.0.0.1 my_zend.local

Then press [CTRL + o] to save the changes.

Open the file /Applications/MAMP/conf/apache/httpd.conf with TextEdit.app and add the following lines at the bottom of the file :

NameVirtualHost my_zend.local
<VirtualHost my_zend.local>
DocumentRoot "/Users/my_name/Sites/my_zend/public"
ServerName my_zend.local
</VirtualHost>

You’ve just created a new virtual host. Simply restart MAMP servers and type http://my_zend.local:8888 in your favourite browser :

Zend Framework installation complete

Have a look at the source code : the <html>, <head> and <body> tags are missing. We’ll activate layout in ZF in order to be able to add the missing tags to all our pages.

Enable layout in ZF

Just open a terminal window and type the path to your ZF project :

cd /Users/my_name/Sites/my_zend/

Then type the following command to enable layout :

/Users/my_name/Sites/ZF/bin/zf.sh enable layout

Notice the /application/layout/ directory structure :

layout directory

The file /application/configs/application.ini has also been changed to point the layout directory.

In order to have a correct XHTML Doctype declaration, we have to initialize the view object because declaring a doctype will call a view. We’ll achieve this in modifying the file /application/configs/application.ini and add the following line at the bottom of the [production] section :

resources.view[] = ""

Then declare the doctype in /application/Bootstrap.php :

class Bootstrap extends Zend_Application_Bootstrap_Bootstrap
{
protected function _initDoctype()
{
$this->bootstrap('view');
$view = $this->getResource('view');
$view->doctype('XHTML1_STRICT');
}
}

This being done, you can fill the file /application/layouts/scripts/layout.phtml with the following :

<!-- application/layouts/scripts/layout.phtml -->
<?php echo $this->doctype() ?>
<html xmlns="http://www.w3.org/1999/xhtml">
<head>
<meta http-equiv="Content-Type" content="text/html; charset=utf-8" />
<title>Zend Framework Quickstart Application</title>
<?php echo $this->headLink()->appendStylesheet('/css/global.css') ?>
<script src="https://ajax.googleapis.com/ajax/libs/jquery/1.6.4/jquery.min.js"></script>
</head>
<body>
<div id="header" style="background-color: #EEEEEE; height: 30px;">
<div id="header-logo" style="float: left">
<b>ZF Quickstart Application</b>
</div>
<div id="header-navigation" style="float: right">
<a href="<?php echo $this->url(
array('controller'=>'index'),
'default',
true) ?>">Index</a>
</div>
</div>
<?php echo $this->layout()->content ?>
</body>
</html>

The source code of the generated Html pages contains all the necessary tags.

Copy Zend library folder

ZF core libraries are to be found in the downloaded /ZF/library/Zend/. Simply copy the Zend directory and copy it in your project : /Users/my_name/Sites/library/ so that it contains the zend directory.

Webliography

Codeigniter Framework

Zend Framework Homepage

Zend Framework download

Zend Framework in action (Book)

Survive The Deep End (Zend book online)

Zend Tutorial by Rob Allen (3-star tutorial)

Choisir la bonne librairie PDF en PHP

Générez des fichiers PDF via PHPIl y a un certain nombre de librairies PDF qui peuvent vous aider à générer des fichiers PDF via PHP : FPDF, TCPDF, DOMPDF, CEZPDF…
J’ai longtemps travaillé avec FPDF qui est une classe très légère (le fichier fpdf.php pèse 49ko), facile à implémenter mais avec des fonctions un peu basiques.

TCPDF m’a tout d’abord conquis parce qu’elle permet d’envoyer de l’HTML (tableaux, css,…) à la classe. Ceci est une grande avancée puisqu’il n’est plus nécessaire de définir les abscisses et ordonnées de toutes les informations à faire apparaître sur le PDF. Le tableau HTML est affiché comme dans une page Web. Elle offre aussi des outils de transformation qui permettent par exemple d’afficher du texte à 90 degrés, par exemple. Mais la classe TCPDF est beaucoup trop lourde : 963 ko. J’utilise des scripts AJAX pour générer une grande quantité de fichiers PDF et ces scripts doivent charger la classe de 1Mo à chaque AJAX call, ce qui rend le temps de génération des fichiers PDF extrêmement long. J’ai bien essayé d’alléger la classe et enlevant tous les commentaires mais il restait quand même un fichier de 500Ko à charger.

J’ai donc décidé de revenir à FPDF et ai trouvé une classe qui étend la classe FPDF pour autoriser la rotation de texte sur le fichier PDF.

Ce tuto décrira l’implémentation de la classe FPDF (et ses classes de rotation) dans le framework PHP Codeigniter 2.0.3.

Tout d’abord, téléchargez la classe FPDF. Vous la trouverez sur la page de téléchargement de http://www.fpdf.org. Avec la classe PHP fpdf.php, vous trouverez des tutoriels et des docs dans le fichier téléchargé.

Copiez simplement le fichier fpdf.php dans /Codeigniter_2.0.3/application/libraries/ et copiez le répertoire font/ dans /Codeigniter_2.0.3/application/third_party/fpdf/

Allez ensuite sur http://www.fpdf.org/fr/script/script2.php où vous trouverez 2 classes à copier dans le même répertoire libraries/ :

  • la classe FPDF_Rotate, une extension de la classe FPDF
  • la classe PDF, une extension de la classe FDPF_Rotate

En créant ces 2 classes dans Codeigniter, suivez bien les conseils de CI concernant la création de libraries. Au besoin, vous trouverez les fichiers attachés en bas de ce tutoriel.

Vous définirez ensuite le chemin vers le répertoire font de FPDF dans /Codeigniter_2.0.3/application/config/config.php :

//FPDF FONT DIRECTORY
$config['fonts_path'] = APPPATH.'third_party/fpdf/fonts/';

Enfin, dans votre controller, appelez simplement la librairie et définissez les items nécessaires :
define('FPDF_FONTPATH',$this->config->item('fonts_path'));
$this->load->library(array('fpdf','fpdf_rotate','pdf'));
$this->pdf->Open();
$this->pdf->SetFont('Arial', '', 12);
$this->pdf->SetDrawColor(0);
$this->pdf->RotatedText(10,40,'Hello World!',90);
$this->pdf->MultiCell(100,5,"Test\nSecond line");
$this->pdf->Output('./pdfs/test.pdf', 'F');

Vous pouvez télécharger les fichiers nécessaires : fichiers de la classe pdf

Webliography :

FPDF Class

TCPDF

DOMPDF

Choosing the right PDF library in PHP

Generate pdf files with PHPThere are a number of PDF libraries that can help you dynamically generate .PDF files through PHP : FPDF, TCPDF, DOMPDF, CEZPDF…
I’ve long worked with FPDF which is very light (with a core file of 49ko), easy to implement but the functions provided are limited.

TCPDF first astonished me since it is able to display pure HTML in a pdf file (tables, css,… support). It also provides transformation functions that allow you to display text vertically on a .pdf file, for example. But the TCPDF core file is much too heavy : 963 ko. I run AJAX scripts that load that library at each AJAX call, which makes the time waiting for the .pdf files to be ready much too long. So, I’ve tried to make that class lighter and got rid of all comments it contained. But I still had more than 500ko of file.

I then decided to go back to FPDF and found an extension class that allows FPDF to rotate text on a page.

This tutorial is devoted to implementing FPDF (and rotation class) in PHP framework Codeigniter 2.0.3.

First download the FPDF class. You’ll find it in the download page of http://www.fpdf.org. Along with the fpdf.php class, you’ll find tutorials and docs in the downloaded file

Simply copy the file fpdf.php to /Codeigniter_2.0.3/application/libraries/ and copy the font/ directory to /Codeigniter_2.0.3/application/third_party/fpdf/

Then go to http://www.fpdf.org/fr/script/script2.php where you’ll find two classes you’ll copy in the same libraries directory:

  • The FPDF_Rotate class as an extension of the FPDF class
  • The PDF class as an extension of the FDPF_Rotate class

Be careful when creating those two libraries in Codeigniter to follow Codeigniter’s tips on creating libraries. You’ll find the files attached to the bottom of this tutorial.

You’ll also have to define the path to the FPDF font directory in /Codeigniter_2.0.3/application/config/config.php :

//FPDF FONT DIRECTORY
$config['fonts_path'] = APPPATH.'third_party/fpdf/fonts/';

Then, in your controller, simply call the library and set the necessary items :
define('FPDF_FONTPATH',$this->config->item('fonts_path'));
$this->load->library(array('fpdf','fpdf_rotate','pdf'));
$this->pdf->Open();
$this->pdf->SetFont('Arial', '', 12);
$this->pdf->SetDrawColor(0);
$this->pdf->RotatedText(10,40,'Hello World!',90);
$this->pdf->MultiCell(100,5,"Test\nSecond line");
$this->pdf->Output('./pdfs/test.pdf', 'F');

You can download the necessary files : fpdf class files

Webliography :

FPDF Class

TCPDF

DOMPDF

Configurer Aptana pour connecter des bases de données MySql

Utiliser Aptana comme IDE PHP est super mais devoir systématiquement changer de fenêtre de travail pour afficher PhpMyadmin et vérifier la structure des tables Mysql devient vite lassant (même si [CMD + TAB] ou [CTRL + TAB] rendent la chose un peu plus aisée). Dans ce cadre, il pourrait être utile de configurer une connection MySql sous Aptana.

Cet article présente la configuration sous Mac OSx 10.6 avec MAMP. Mais vous pourriez aisément configurer Aptana de la même manière avec une solution LAMP (sous Linux) ou WAMP (sous Windows).

Pour cette configuration, vous aurez besoin du MySql Connector/J driver que vous trouverez sur http://www.mysql.com/downloads/connector/j/. Téléchargez-le et décompressez-le dans le répertoire /Mamp/Library/share/Mysql/Connectors/.

1. Installer le plugin Sql Explorer pour Aptana

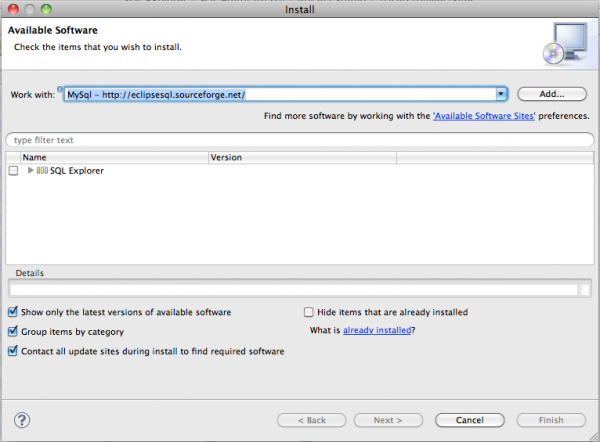
Tout d’abord, vous devrez installer le plugin Sql Explorer plugin pour Aptana : Sélectionnez le Menu Help / Install Software, puis cliquez sur le bouton “Add” pour ajouter un site source pour l’installation du plugin. Donnez-lui un nom (MySql) et l’emplacement suivant : http://eclipsesql.sourceforge.net/

Puis sélectionnez le site source nouvellement créé de la liste déroulante et cochez “SQL Explorer” avant de cliquer sur le bouton “finish” :

Add download site for Sql Explorer

2. Créer une connexion MySql

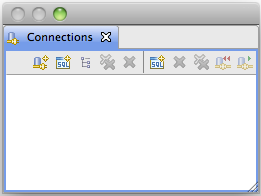
Ouvrez Aptana et sélectionnez le Menu Window / Open perspective / Other / SQL Explorer. Puis sélectionnez le menu Window / Showview / Connections pour créer une nouvelle connexion à MySql :

Window - Showview - Connections (create a MySql connection)

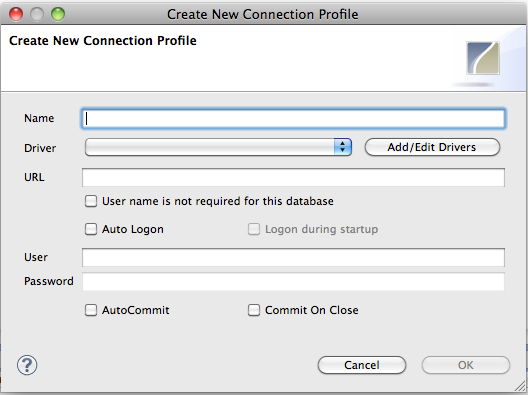
Cliquez sur le bouton “Create new connection profile” pour configurer le driver MySql : Create new database connection profile et afficher :

Configure Mysql connection

Donnez un nom à votre connexion : Mysql

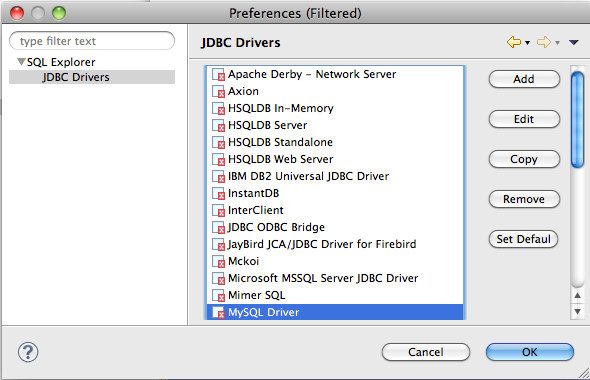
Puis cliquez sur “Add/Edit drivers”, et affichez le contenu de “SQL Explorer” dans le menu de gauche et cliquez sur “JDBC Drivers” puis sélectionnez “MySql Driver”:

Edit MySql driver

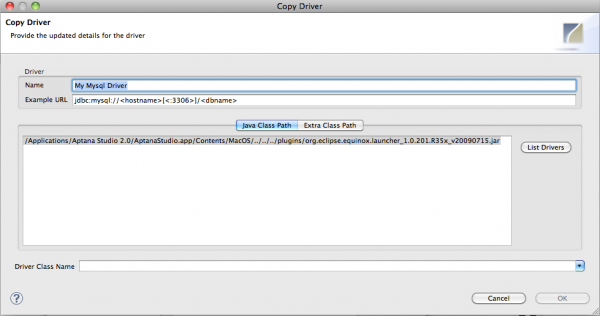
Choisissez le bouton “Copy” pour éditer les préférences d’une copie du MySql Driver et donnez un nom à votre driver (My MySql driver) :

Editing Mysql driver

Editez l’example URL comme suit :

jdbc:mysql://localhost:3306/

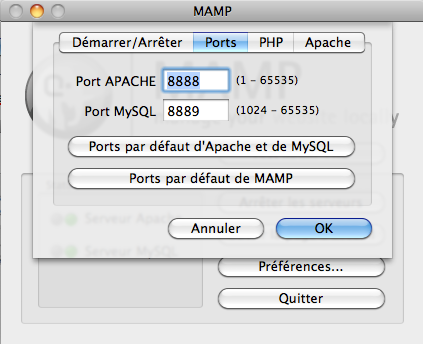
Vous devrez aussi changer le port puisque le port 3306 est le port de connexion MySql par défaut. Ouvrez MAMP et cliquez sur Preferences / Ports :

Checking MAMP MySql connection port

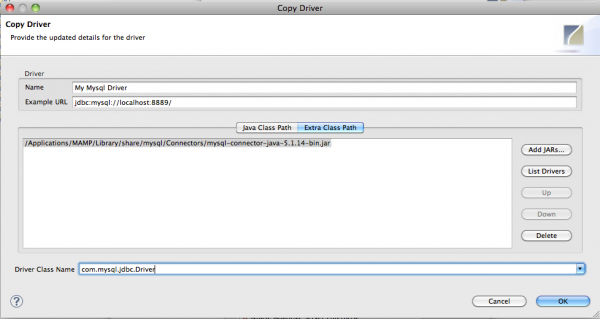
puis changez l’example URL du driver MySql :

jdbc:mysql://localhost:8889/

Cliquez ensuite sur le bouton “Extra class path” pour ajouter le MySql Connector/J driver (fichier mysql-connector-java-5.1.14-bin.jar) que vous trouverez dans /Mamp/Library/share/Mysql/Connectors/.

et complétez le Driver class name comme suit :

com.mysql.jdbc.Driver

Votre bopite de dialogue de Préférences driver devrait ressembler à ceci :

Mysql driver preferences

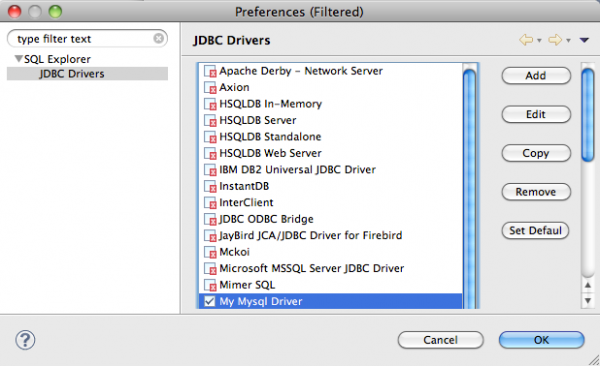
Cliquez “OK”. Aptana montre que votre driver a été correctement configuré :

Mysql driver correctly configured

Cliquez “OK” pour sélectionner “My MySql Driver” pour la connexion courante :

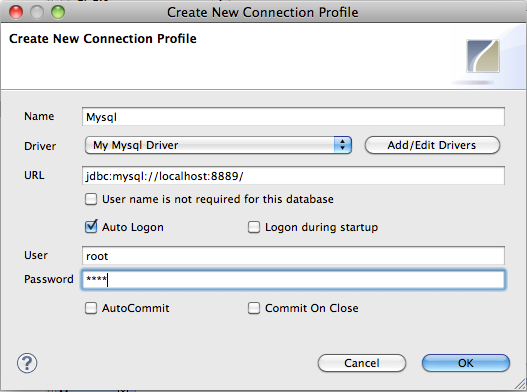
Dans la boîte de dialogue “Create new connection profile”, sélectionnez le driver MySql nouvellement créé (My Mysql Driver) dans la liste déroulante. Cochez “auto logon” et saisissez le username et password root MySql :

Set MySql username and password

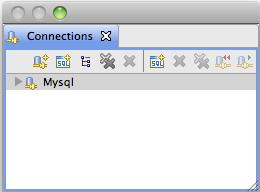
puis cliquez “OK”. Votre connexion est maintenant prête :

MySql connection ready

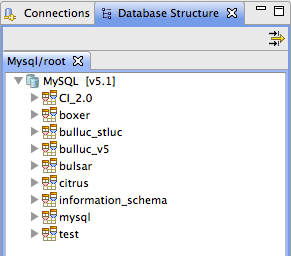
Opérez un clic droit sur votre connexion “Mysql” pour visualiser les structures de vos bases de données :

View Database structures

Configuring Aptana to connect MySql databases

Using Aptana is great but having to constantly switch to PhpMyadmin to check Mysql table structures can be tiring (even if [CMD + TAB] or [CTRL + TAB] makes it a bit easier). It may then be useful to configure a MySql connection in Aptana.

This post will tackle the configuration on Mac OSx 10.6 with MAMP installed. But you could easily configure Aptana the same way on LAMP (Linux) or WAMP (Windows) platforms.

Therefore, you’ll need the MySql Connector/J driver that can be found on http://www.mysql.com/downloads/connector/j/. Download and unzip it in the /Mamp/Library/share/Mysql/Connectors/ folder.

1. Install Sql Explorer plugin in Aptana

First, you’ll need to install the Sql Explorer plugin for Aptana : Select Menu Help / Install Software, then click “Add” to add a site for the plugin install. Give it a name (MySql) and the following location : http://eclipsesql.sourceforge.net/

Then select your newly created source site from the combo box and tick “SQL Explorer” before clicking the “finish” button :

Add download site for Sql Explorer

2. Create a MySql connection

Open Aptana and select Menu Window / Open perspective / Other / SQL Explorer. Then select Menu Window / Showview / Connections to create a new connection to Mysql :

Window - Showview - Connections (create a MySql connection)

Click on the “Create new connection profile” button to configure the MySql driver : Create new database connection profile to display :

Configure Mysql connection

Give a name to your connection : Mysql

Then click on “Add/Edit drivers”, then expand the “SQL Explorer” from the left menu and click on “JDBC Drivers” and select “MySql Driver”:

Edit MySql driver

Then click the “Copy” button to edit preferences on a copy of the item and give your driver a new name (My MySql driver) :

Editing Mysql driver

Edit the example URL as follows :

jdbc:mysql://localhost:3306/

You still need to change the port since port 3306 is the default MySql connection port. Open MAMP and click Preferences / Ports :

Checking MAMP MySql connection port

then change the MySql driver example URL :

jdbc:mysql://localhost:8889/

Then click the “Extra class path” button to add the MySql Connector/J driver (file mysql-connector-java-5.1.14-bin.jar) that is to be found in /Mamp/Library/share/Mysql/Connectors/.

and fill in the Driver class name as follows :

com.mysql.jdbc.Driver

Your driver preferences dialog should look like this :

Mysql driver preferences

Then click “OK”. Aptana now shows your driver as being correctly configured :

Mysql driver correctly configured

Click “OK” to select “My MySql Driver” for the present connection.

In the “Create new connection profile” dialog, select the newly created Mysql driver (My Mysql Driver) from the combo box. Tick “auto logon” and type the MySql root username and password :

Set MySql username and password

and click “OK”. Your Connection is now ready :

MySql connection ready

Right click your “Mysql” connection to view database structures :

View Database structures

Un formulaire sous Codeigniter avec Ajax

codeigniterCodeIgniter (CI), le framework PHP, est passé à la version 2.0. Cette version a été réécrite pour fonctionner en PHP5 exclusivement : les helpers des versions antérieures étaient en PHP4. Une belle amélioration attendue en soi. Ce framework est léger et aide les développeurs à travailler plus vite. Cet article traitera de :
  • la configuration du framework
  • la création d’un formulaire de login avec requête Ajax.

1. installation de CI

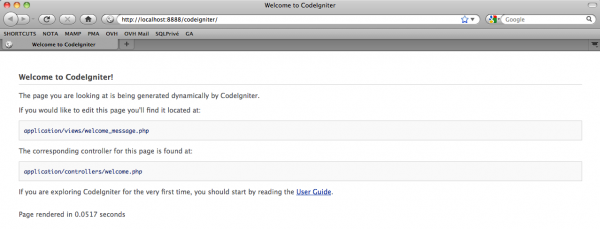
Téléchargez la version 2.0 à partir du site http://codeigniter.com/. Décompressez l’archive et placez les fichiers dans un sous-répertoire de votre /www/. Quand vous chargez la page http://localhost:8888/codeigniter/, vous verrez la page suivante (j’ai installé CI sur ma machine locale et le port MAMP (solution Mac Apache-Mysql-PHP) par défaut est 8888. Si vous travaillez sous windows avec une solution WAMP http://localhost/codeigniter/ suffira :

Ouvrir Codeigniter dans votre navigateur

La page affichée est /application/views/welcome_message.php qui est chargée via /application/controllers/welcome.php. Ce contrôleur contient la classe Welcome qui est définie comme le contrôlleur par défaut dans /application/config/routes.php. Si vous voulez appeler ce contrôleur dans l’url, vous devrez utiliser http://localhost:8888/codeigniter/index.php/welcome. Dans cette url, index.php est le contrôleur principal de CI que vous trouverez dans le répertoire root /codeigniter/. Ce fichier devra rester mais vous pouvez l’enlever de l’url : pour cela :

  • ouvrez /config/config.php et changez le index_page : $config['index_page'] = “”;
  • puis ajoutez un fichier .htaccess file à la racine de votre projet /codeigniter/ :

SetEnv MAGIC_QUOTES 0
SetEnv PHP_VER 5
Options +FollowSymlinks -MultiViews
RewriteEngine On
DirectoryIndex index.php
RewriteCond %{REQUEST_URI} ^system.*
RewriteRule (.*) index.php?/$1 [L]
RewriteCond %{REQUEST_FILENAME} !-f
RewriteCond %{REQUEST_FILENAME} !-d
RewriteCond $1 !^(index\.php|images|robots\.txt|css)
RewriteRule (.*) index.php?/$1 [L]

Ainsi, vous activerez le Mod_rewrite d’Apache et serez capable de charger http://localhost:8888/codeigniter/index.php/welcome via http://localhost:8888/codeigniter/welcome.

Ouvrons maintenant quelques fichiers de configuration CodeIgniter pour configurer la connexion à la base de données et quelques autres points.

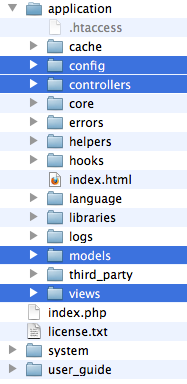
1.1. La structure des fichiers Codeigniter : un framework MVC

En jetant un oeil au répertoire /www/codeigniter/ vous constaterez la structure suivante :

Structure MVC des fichiers Codeiginiter

Comme vous les voyez, CI est un framework MVC :

  • le répertoire /application/ contient les fichiers de votre projet :
  • le répertoire /application/controllers/ contient les fichiers des contrôleurs (pour recevoir des informations et effectuer des requêtes aux modèles)
  • le répertoire /application/models/ contient les fichiers de requêtes à la base de données
  • le répertoire /application/views/ contient les vues (fichiers Html, formulaires,…)

Un autre répertoire important est /system/ : il contient tous les fichiers CI (librairies, helpers,…)

Les fichiers de configuration de CI se trouvent dans /application/config/. Ouvrez /config/config.php et changez les lignes suivantes :

  • site url : $config['base_url'] = “http://localhost:8888/codeigniter/”;
  • index file : $config['index_page'] = “”;

Puis ouvrez /application/config/database.php pour configurer les informations de connexion à la base de données :

  • $db['default']['hostname'] = ‘localhost’;
  • $db['default']['username'] = ‘root’;
  • $db['default']['password'] = ‘root’;
  • $db['default']['database'] = ‘codeigniter’;

et adaptez les valeurs à votre propre configuration.

Nous pouvons aussi charger des librairies ou helpers CI de manière automatisée. Vous ne devrez donc pas les ouvrir dans chaque contrôleur. Ouvrez /config/autoload.php et modifiez les lignes suivantes :

  • $autoload['libraries'] = array(‘database’); //pour charger la librairie CI de connexion à la base de données de manière automatique
  • $autoload['helper'] = array(‘url’,'form’); //pour charger les helpers url et formulaire

1.2. Configurer la base de données

Ouvrez votre navigateur et chargez PhpMyAdmin : http://localhost:8888/phpmyadmin/ puis exécutez les requêtes suivantes :
CREATE DATABASE codeigniter;
CREATE TABLE users ( user_ID int unsigned not null auto_increment primary key, username varchar(20), password varchar(32) );

2. Création du formulaire de login

Le formulaire Html que nous allons créer est simple. Codeigniter possède des librairies et helpers que vous trouverez dans le réperoire /system/. Nous avons précédemment chargé le helper “form” de manière automatique (en modifiant le fichier /application/config/autoload.php) pour nous aider à construire notre formulaire.

Créez le fichier /application/views/v_login.php (j’utilise le préfixe ‘v_’ pour différencier plus aisément les vues (‘v_’) des modèles (‘m_’) et contrôleurs (‘c_’)) :
<!DOCTYPE html>
<html lang="fr">
<head>
<title>Login</title>
<meta name="robots" content="index,follow" />
<meta name="description" content="Login" />
<meta http-equiv="Content-type" content="text/html; charset=iso8859-1" />
<script src="http://ajax.googleapis.com/ajax/libs/jquery/1.4/jquery.min.js"></script>
<style type="text/css">
p { margin: 0; padding: 0; }
input.textbox { width: 120px;color: #777;height: 18px;padding: 2px;border: 1px solid #E5E5E5;vertical-align: top; }
input.button { width: auto;height: 22px;padding: 2px 5px;vertical-align: top; }
</style>
</head>
<body>
<?php
echo form_open('login');
?>
<div id="message">
</div>
<p>
<label for'username'>username</label>
<?=form_input(array('name'=>'email','value'=>'','class'=>'username textbox','style'=>'width:150px;'))?><br />
</p>
<p>
<label for'password'>password</label>
<?=form_password(array('name'=>'password','value'=>'','class'=>'password textbox'))?><br />
</p>
<p>
<?='<br />'.form_submit('submit','Login','id="submit"')?>
</p>
<?=form_close("\n")?>
</body>
</html>

Vous constatez que nous faisons ici appel à des fonctions du helper “form” : ‘form_open()’, ‘form_close()’ qui génèrent les <form> et </form>.

La balise <head> de cette vue contient aussi le lien vers le fichier Jquery.js dont nous aurons besoin pour faire fonctionner notre script Ajax : <script src="http://ajax.googleapis.com/ajax/libs/jquery/1.4/jquery.min.js"></script>

La div “message” sera utilisée pour afficher la réponse du script Ajax.

Le formulaire Html est prêt mais il nous faut maintenant créer le contrôleur qui chargera cette vue.

3. Création du contrôleur de login

Créez le fichier /application/controllers/c_login.php.
<?php if ( ! defined('BASEPATH')) exit('No direct script access allowed');
class C_login extends CI_Controller {
function __construct() {
parent::__construct();
$this->load->library('form_validation');
}
function index() {
$this->load->view('v_login');
}
}
/* End of file c_login.php */
/* Location: ./application/controllers/c_login.php */

Le constructeur de ce contrôleur charge la librairie form_validation que nous utiliserons pour vérifier le contenu des champs du formulaire postés.

Pour charger ce contrôleur dans un navigateur, appelez la page http://localhost:8888/codeigniter/c_login

La méthode de ce contrôleur qui sera appelée par défaut est la méthode index() qui charge la vue du formulaire (v_login.php)

Pour que le contrôleur c_login devienne le contrôleur par défaut, et puisse être appelé http://localhost:8888/codeigniter/, vous devrez changer /application/config/routes.php et saisir c_login comme contrôleur par défaut :

$route['default_controller'] = “c_login”;

Si vous désirez que ce contrôleur soit accessible via http://localhost:8888/codeigniter/login, éditez /application/config/routes.php et ajoutez :

$route['login'] = ‘c_login’;

4. Création de la requête Ajax

Retournons maintenant au fichier /views/v_login.php.

Nous allons rédiger un script javascript qui :

  • s’exécutera lorsque l’utilisateur cliquera sur le bouton submit
  • n’enverra pas les données du formulaire au contrôleur via une requête http mais via une requête ajax
  • récupérera les contenus des champs du formulaire en javascript
  • passera ces valeurs au contrôleur via une requête Ajax

Ajoutez le code suivant juste avant la balise de fermeture </head> :

<script type="application/javascript">
$(document).ready(function() {
$('#submit').click(function() {
var form_data = {
username : $('.username').val(),
password : $('.password').val(),
ajax : '1'
};
$.ajax({
url: "<?php echo site_url('login/ajax_check'); ?>",
type: 'POST',
async : false,
data: form_data,
success: function(msg) {
$('#message').html(msg);
}
});
return false;
});
});
</script>

Jquery nous permet d’exécuter une fonction dès que le document DOM a été chargé : $(document).ready

Le script sera activé dès que l’utilisateur clique sur le bouton submit : $(‘#submit’).click : le signe # identifie l’attribut “id” d’un élément de la page (le bouton submit dans ce cas).

Puis nous stockons les variables du formulaire (username et password que nous récupérons grâce à la classe de style $(‘.username’)) dans l’array form_data. Cet array contient également la clé “ajax” avec “1″ comme valeur. Cette valeur sera testée dans le contrôleur.

Puis vient la requête $.ajax qui contient le tableau suivant :

  • url : l’url vers laquelle la requête sera envoyée
  • type : les variables seront postées au contrôleur
  • data : l’array des variables à passer au contrôleur
  • success : ce que le script doit faire si la requête est réussie : le contrôleur renverra un commentaire qui sera affiché dans la div $(‘#message’).

return : false; est utilisé pour empêcher l’envoi du formulaire par http quand l’utilisateur clique sur le bouton submit.

Dans cet exemple, l’url “login/ajax_check” ne sera accessible que dans le cas où vous ajoutez le code suivant dans /config/routes.php :

$route['login/ajax_check'] = 'c_login/ajax_check';

5. La fonction ajax_check du contrôleur : création de la méthode de traitement des données reçues via Ajax

Nous créons ensuite une seconde méthode du contrôleur c_login : ajax_check() pour vérifier les données postées via Ajax.

function ajax_check() {
if($this->input->post('ajax') == '1') {
$this->form_validation->set_rules('username', 'username', 'trim|required|xss_clean');
$this->form_validation->set_rules('password', 'password', 'trim|required|xss_clean');
$this->form_validation->set_message('required', 'Please fill in the fields');
if($this->form_validation->run() == FALSE) {
echo validation_errors();
} else {
echo 'login successful';
}
}
}

Le script vérifie d’abord si la variable “ajax” est égale à ’1′. Si c’est le cas, nous utilisons la librairie CI de validation des formulaires pour vérifier les champs requis et afficher les erreurs de validation éventuelles.

6. Exécuter le script

Ouvrez Fifrefox et installez l’addon Firebug s’il n’est pas encore installé : https://addons.mozilla.org/fr/firefox/addon/firebug/

Cet addon vous permettra de vérifier pas à pas la progression de votre requête ajax. Lancez Firebug via Menu Outils / Firebug. Puis activez la console :

Firebug - console

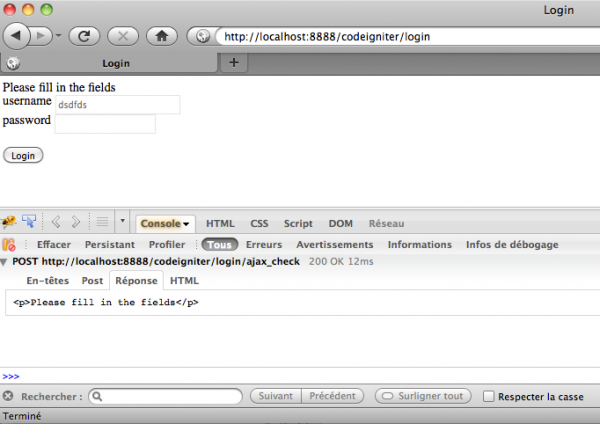
Ouvrez la page de login : http://localhost:8888/codeigniter/login et cliquez sur le bouton “submit”. Vous verrez la réponse Ajax suivante :

Ajax response

7. Vérifier l’utilisateur dans la base de données : utilisation des modèles

Nous allons changer la méthode ajax_check du contrôleur c_login pour charger un modèle et vérifier si l’utilisateur existe dans la base de données :
function ajax_check() {
if($this->input->post('ajax') == '1') {
$this->form_validation->set_rules('username', 'username', 'trim|required|xss_clean');
$this->form_validation->set_rules('password', 'password', 'trim|required|xss_clean');
$this->form_validation->set_message('required', 'Please fill in the fields');
if($this->form_validation->run() == FALSE) {
echo validation_errors();
} else {
$this->load->model('m_access');
$user = $this->m_access->check_user($this->input->post('username'),$this->input->post('password'));
if($user == '1') {
echo 'login successful';
} else {
echo 'unknown user';
}
}
}
}

Ce script charge le modèle m_access, puis nous appelons la méthode check_user et lui envoyons les variables username et password.

Voici le modèle /application/models/m_access.php :
<?
class M_access extends CI_Model {
public function check_user($username,$password) {
$this->query = $this->db->select('COUNT(*)')->from('users')->where(array('username'=>$username,'password'=>$password))->limit(1)->get();
return $this->query->row_array();
}
}

Vous pouvez télécharger les fichiers : codeigniter

Codeigniter form with Ajax

codeigniterCodeIgniter (CI), the PHP framework, has evolved towards version 2.0. The main version feature is scripts are being rewritten in PHP5 (helpers in former verisons were still in PHP4). This framework is lightweight and helps developers work faster. This post will tackle :

  • the framework configuration
  • the building of a login form with an Ajax request

1. CI installation

First download CodeIgniter 2.0 source from http://codeigniter.com/ (follow the link ‘Get Source’). Unzip that file and place it in your local /www/ directory. Loading the page http://localhost:8888/codeigniter/ will display the following page (I’ve installed it on my local machine and the default port for MAMP (Mac Apache-Mysql-PHP solution) is 8888. If you’re working under windows with a WAMP solution, http://localhost/codeigniter/ will do the trick) :

Open CodeIgniter in your browser

The page which is displayed is /application/views/welcome_message.php which is loaded via /application/controllers/welcome.php. This controller contains the class Welcome which is defined as the default controller in /application/config/routes.php. If you want to reach that controller in the URL, you’ll have to use http://localhost:8888/codeigniter/index.php/welcome. In that URL, index.php is the CI front controller which is to be found in the root directory /codeigniter/. You will have to keep that index.php file but you can take it away from the URL :

  • open /config/config.php and change the index_page to $config['index_page'] = “”;
  • then add a .htaccess file to the root of your project /codeigniter/ :

SetEnv MAGIC_QUOTES 0
SetEnv PHP_VER 5
Options +FollowSymlinks -MultiViews
RewriteEngine On
DirectoryIndex index.php
RewriteCond %{REQUEST_URI} ^system.*
RewriteRule (.*) index.php?/$1 [L]
RewriteCond %{REQUEST_FILENAME} !-f
RewriteCond %{REQUEST_FILENAME} !-d
RewriteCond $1 !^(index\.php|images|robots\.txt|css)
RewriteRule (.*) index.php?/$1 [L]

In doing so, you’ll activate Apache Mod_rewrite and be able to load http://localhost:8888/codeigniter/index.php/welcome via http://localhost:8888/codeigniter/welcome.

Now, we’ll open some CodeIgniter configuration files to setup database connection and other stuff :

1.1. Codeigniter file structure : the MVC framework

If you take a look at the /www/codeigniter/ directory, you’ll see the following structure :

Codeigniter file structure

As you can see, Codeigniter is an MVC framework. The /application/ directory is the directory of your project files :

  • the /controllers/ directory contains controller files (receive input and make requests to the models)
  • the /models/ directory contains model files (requests to the database)
  • the /views/ directory contains view files (Html, formulaires,…)

Another important directory is /system/ : it contains all the Codeigniter core files (libraries, helpers,…)

Codeigniter config files are stored in the /config/ directory. Let’s open /config/config.php and change the following lines :

  • Base site url : $config['base_url'] = “http://localhost:8888/codeigniter/”;
  • Index file : $config['index_page'] = “”;

Then open /config/database.php to set up the database connection information :

  • $db['default']['hostname'] = ‘localhost’;
  • $db['default']['username'] = ‘root’;
  • $db['default']['password'] = ‘root’;
  • $db['default']['database'] = ‘codeigniter’;

and change the values to suit your own configuration.

We also need to autoload CI core libraries and helpers that will automatically load at each request and make our work much easier. Open /config/autoload.php and change the following lines :

  • $autoload['libraries'] = array(‘database’); //to automatically load CI’s database library (class for database connection)
  • $autoload['helper'] = array(‘url’,'form’); //to automatically load CI’s url and form helpers (classes for url handling and form building)

1.2. Setting up the database

Now, turn to your browser and load PhpMyAdmin : http://localhost:8888/phpmyadmin/ and execute the following queries :
CREATE DATABASE codeigniter;
CREATE TABLE users ( user_ID int unsigned not null auto_increment primary key, username varchar(20), password varchar(32) );

2. Creating the login form

The Html form we will create is rather easy. Codeigniter is made of core libraries and helpers that you’ll find in the /system/ directory. We’ve autoloaded the form helper to help us build our form.

So, create the file in /application/views/v_login.php (I use the ‘v_’ prefix to make the difference between views (‘v_’), models (‘m_’) and controller (‘c_’) files) :
<!DOCTYPE html>
<html lang="fr">
<head>
<title>Login</title>
<meta name="robots" content="index,follow" />
<meta name="description" content="Login" />
<meta http-equiv="Content-type" content="text/html; charset=iso8859-1" />
<script src="http://ajax.googleapis.com/ajax/libs/jquery/1.4/jquery.min.js"></script>
<style type="text/css">
p { margin: 0; padding: 0; }
input.textbox { width: 120px;color: #777;height: 18px;padding: 2px;border: 1px solid #E5E5E5;vertical-align: top; }
input.button { width: auto;height: 22px;padding: 2px 5px;vertical-align: top; }
</style>
</head>
<body>
<?php
echo form_open('login');
?>
<div id="message">
</div>
<p>
<label for'username'>username</label>
<?=form_input(array('name'=>'email','value'=>'','class'=>'username textbox','style'=>'width:150px;'))?><br />
</p>
<p>
<label for'password'>password</label>
<?=form_password(array('name'=>'password','value'=>'','class'=>'password textbox'))?><br />
</p>
<p>
<?='<br />'.form_submit('submit','Login','id="submit"')?>
</p>
<?=form_close("\n")?>
</body>
</html>

As you can see, the form helper is here at work with methods like ‘form_open()’, ‘form_close()’ that will automatically generate <form> and </form> tags.

The <head> of this view already contains the link to the Jquery.js file we will need to have our Ajax script work properly : <script src="http://ajax.googleapis.com/ajax/libs/jquery/1.4/jquery.min.js"></script>

The “Message” div will be used to display the Ajax Response.

The Html form is now ready but we still need to build the controller class that will load that view.

3. Creating the login controller

Create the file /application/controllers/c_login.php.
<?php if ( ! defined('BASEPATH')) exit('No direct script access allowed');
class C_login extends CI_Controller {
function __construct() {
parent::__construct();
$this->load->library('form_validation');
}
function index() {
$this->load->view('v_login');
}
}
/* End of file c_login.php */
/* Location: ./application/controllers/c_login.php */

The constructor of this controller loads the form_validation library which we will use to check the content of the posted fields. We’ll also use the url helper to build the url of the form action attribute.

In order to load this controller in a browser, you’ll simply have to call http://localhost:8888/codeigniter/c_login

The default method that will be called is the index() method that simply loads the form view (v_login.php)

To make this controller your default controller and be able to reach it via http://localhost:8888/codeigniter/, you’ll have to change /application/config/routes.php and set the default controller to c_login:

$route['default_controller'] = “c_login”;

If you want that controller to be reached via http://localhost:8888/codeigniter/login, simply edit /application/config/routes.php and add :

$route['login'] = ‘c_login’;

4. Creating the Ajax request

Let’s go back to our /views/v_login.php.

We’ll write a short javascript that will :

  • bypass the form submit to the login controller via http
  • get the values of the necessary fields in javascript
  • pass these values to the controller via an Ajax request

Just add the following code just before the </head> tag :

<script type="application/javascript">
$(document).ready(function() {
$('#submit').click(function() {
var form_data = {
username : $('.username').val(),
password : $('.password').val(),
ajax : '1'
};
$.ajax({
url: "<?php echo site_url('login/ajax_check'); ?>",
type: 'POST',
async : false,
data: form_data,
success: function(msg) {
$('#message').html(msg);
}
});
return false;
});
});
</script>

Jquery allows us to execute a function once the DOM document has been loaded : $(document).ready

The script will be triggered once the submit button is hit : $(‘#submit’).click : the # sign identifies the “id” attribute of an element of the page (the submit button in this case).

Then we store the posted variables (username and password) in the form_data array. This array also contains the “ajax” key with value “1″. This value will be checked in the controller.

Then comes the $.ajax request which contains an array :

  • url : the url the request must be sent to
  • type : variables are posted to the controller
  • data : the array of variables passed to the controller
  • success : what the script must do if the request is successful : the controller will return a piece of text that will be displayed in the $(‘#message’) div.

return : false; is used to prevent the script from actually reaching the form action url through http when the submit button is clicked.

In this example, the url “login/ajax_check” will only be reachable if you add the following to the /config/routes.php :

$route['login/ajax_check'] = 'c_login/ajax_check';

5. Creating the ajax_check controller method

We will then create a second controller method called ajax_check() to check the variables posted through Ajax.

function ajax_check() {
if($this->input->post('ajax') == '1') {
$this->form_validation->set_rules('username', 'username', 'trim|required|xss_clean');
$this->form_validation->set_rules('password', 'password', 'trim|required|xss_clean');
$this->form_validation->set_message('required', 'Please fill in the fields');
if($this->form_validation->run() == FALSE) {
echo validation_errors();
} else {
echo 'login successful';
}
}
}

The script checks if the ajax variable posted equals to “1″. If so, we use the Codeigniter form_validation library to check the required fields and echo the validation errors if necessary.

6. Playing the script

Open Firefox and install Firebug addon if not yet installed : https://addons.mozilla.org/fr/firefox/addon/firebug/

This addon will let you check the different steps of the ajax request. Launch Firebug via Menu Tools / Firebug. Then activate the console to be able to check what’s happening in your page :

Firebug - console

Open the login page : http://localhost:8888/codeigniter/login and click “submit”. You’ll see the following Ajax response :

Ajax response

7. Checking the database : using models

We’ll change c_login controller method ajax_check and load a model to check if the user exists in the database :
function ajax_check() {
if($this->input->post('ajax') == '1') {
$this->form_validation->set_rules('username', 'username', 'trim|required|xss_clean');
$this->form_validation->set_rules('password', 'password', 'trim|required|xss_clean');
$this->form_validation->set_message('required', 'Please fill in the fields');
if($this->form_validation->run() == FALSE) {
echo validation_errors();
} else {
$this->load->model('m_access');
$user = $this->m_access->check_user($this->input->post('username'),$this->input->post('password'));
if($user == '1') {
echo 'login successful';
} else {
echo 'unknown user';
}
}
}
}

We’ve loaded a model called m_access, then we call the method check_user and send it the username and password variables.

You’ll then create the model itself in /application/models/m_access.php :
<?
class M_access extends CI_Model {
public function check_user($username,$password) {
$this->query = $this->db->select('COUNT(*)')->from('users')->where(array('username'=>$username,'password'=>$password))->limit(1)->get();
return $this->query->row_array();
}
}

You can download the necessary files : codeigniter

De Windows à Linux à Mac

Le Père Noël est passé plus tôt que prévu cette année et a déposé :

Mac book Pro 13.3" 2.4 GHz 4Go 250Go Mac OSx 10.6

un Mac book Pro 13.3″ 2.4 GHz 4Go 250Go Mac OSx 10.6 au pied de mon sapin.

J’avais l’habitude de développer sous un PC Linux avec twinview (2 écrans) et sur des netbooks (Asus EEEPC 10″ (Windows XP) et Asus N10 (Windows Vista)) et j’avais besoin de soulager ma vue quelque peu. J’avais donc l’intention d’acheter un notebook 13″. J’avais toujours été un peu réticent à acheter un matériel Apple puisqu’il est toujours un peu plus cher que son “équivalent hardware” en PC. Cette fois-ci, j’ai changé d’avis et choisi un MacBook Pro 13.3″ qui a coûté environ 1.100 €.

Pas besoin de préciser que je n’ai aucun regret : au delà du bel objet, il est fourni avec un lot de logiciels très efficaces comme Time machine (sauvegarde auto des données sur un HD externe et possibilité de restaurer une sauvegarde antérieure), Automator (pour créer des scripts à charger au démarrage, par exemple),…

Pour le développement Web, j’ai aussi installé :

  • Aptana
  • Mamp (Apache, MySql & PHP pour Mac)

Installer des logiciels sur Mac est très aisé (usage simple de fichiers .dmg) et Aptana (éditeur PHP basé sur Eclipse-Java) est très avide de ressources sous Windows et Linux OpenSuse mais semble beaucoup plus léger sur le MacBook.

La configuration du MacBook à mes besoins m’a pris une demi journée à peine alors que mon dernier netbook Windows m’avait pris une semaine (pour que l’OS effectue précisément ce que je voulais qu’il fasse).

From Windows to Linux to Mac

Santa Claus has dropped a present a bit earlier than usual, this year :

Mac book Pro 13.3" 2.4 GHz 4Go 250Go Mac OSx 10.6

a Mac book Pro 13.3″ 2.4 GHz 4Go 250Go Mac OSx 10.6

I used to develop on a Linux desktop with twinview (2 screens) and on netbooks (Asus EEEPC 10″ (Windows XP) and Asus N10 (Windows Vista)) and I needed to relieve my eyesight. So, I wanted to buy a 13″ screen notebook. I had always been a bit reluctant to buying Apple stuff since they’re a bit more expensive than “hardware equivalent” solutions. This time, I’ve changed my mind and chose this MacBook Pro 13.3″ which cost about 1.100 €.

Needless to say I have no regrets. It’s a beautiful object with great embedded apps like Time machine (auto save of data on external HD), Automator (creating script to load at startup, for example),…

For Web developing purposes I’ve insatlled :

  • Aptana
  • Mamp (Apache, MySql & PHP for Mac)

Installling software is very straightforward (simple use of .dmg files) and Aptana (PHP editor based on Eclipse-Java) is very resource-hungry under Windows and Linux OpenSuse but seems much lighter on the MacBook.

It took me half a day to first start the MacBook and configure it to my needs whereas my last Windows netbook took me a week to configure (to have the OS precisely do what I wanted it to do).